Many lovers of recreation in the lap of nature near bodies of water spend their weekends this way. Special tourist campsites in the traditional design are equipped with fishing piers, barbecues, closed gazebos, sites for tents, etc. Until recently, it was impossible to take a steam bath in such conditions. But with the advent of mobile steam rooms, everything changed. From this article you will learn how to make a sauna on wheels with your own hands. The technological sequence of work will help you make a mobile sauna yourself, thus saving your family budget.
Peculiarities
Previously, there was no opportunity to take a steam bath in public recreation areas. An excellent solution was the arrangement of mobile steam rooms. If you work away from a populated area, then a bathhouse on wheels will provide you with the opportunity to wash yourself. This is relevant for geologists. Among some of the advantages of mobile baths it is worth noting:
- There is no need to obtain permission to build a bathhouse.
- No need to pour the foundation.
- You can place a bathhouse on wheels in any convenient place.
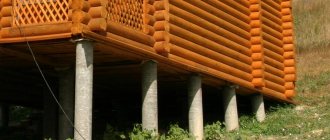
The Russian mobile bathhouse has a traditional layout: a steam room and a place to relax. The stove can run on wood, gas or electricity. Internal lining – natural wood. The steam room capacity is up to 6 people.
The basis of a mobile steam room
To make your own sauna on wheels, you need to purchase a suitable base. It could be:
- trailer for a car;
- all-terrain vehicle/truck (URAL/ZIL/GAZ);
- platform frame on wheels;
- minibus/bus (GAZelle/Ikarus/PAZ).
This means that you can make a bathhouse that is inseparable from a vehicle, make it on a trailer or on a mobile platform that can be loaded as needed.
The technology for arranging a mobile bathhouse is almost similar to arranging a stationary steam room.
Trailer
Bathhouse trailers must have a mass that does not exceed the weight of the tractor, i.e., a passenger car. Additional supports must prevent the trailer from swaying during operation. The internal space is divided into a steam room and a dressing room. Due to limited space, there are no water tanks in such a bathhouse.
This means that you should take bath procedures only if you park your car near a pond. If necessary, you can heat water on the stove. You can drain the water through a hole located in the floor. So, the liquid will flow directly onto the ground under the wheels of the trailer.
Converted buses/trucks
A truck converted into a bathhouse
If you want to make a spacious mobile steam room, then you should think about how to convert a bus. If you make it on the basis of the Ikarus bus, then the capacity of the bathhouse will be up to 15 people. This bathhouse is equipped with:
- shower compartment;
- steam room for 5 people;
- rest room;
- auto toilet;
- video bar stand.
Bus steam room
The disadvantage of Ikarus is its low cross-country ability. In view of this, Soviet-era army trucks are the most popular for arranging mobile baths. These SUVs will allow you to steam near your favorite lake, even if there is no proper access to it.
We build a steam room with our own hands step by step
The mobile bathhouse is constructed using frame technology. The frame can be welded from a metal pipe, but in a lightweight version they are made from timber treated with protective compounds. First, the lower trim is made from beams with a cross-section of 100x150 mm, connecting them into a quarter. It is necessary to constantly check its horizontalness using a building level. All corners of the bottom trim must be straight.
Further, in order not to work at height, the frame for each wall is built and fastened on a flat surface of the ground. Then they are lifted and secured in place with self-tapping screws. The optimal height of the bath is about two meters. The upper frame frame is made of timber of the same cross-section as the lower one.
To give rigidity to the structure, eight braces must be installed in the corners of the bathhouse, and intermediate racks must be placed along the perimeter of the walls. After installation, the entire frame is sheathed: on the outside - with slabs, edged boards, block house, and on the inside, the walls of the mobile bathhouse are sheathed with wooden clapboard. Insulation and waterproofing are laid between them.
Vapor protection is used to protect thermal insulation material from moisture. It is important to remember: if the insulation gets wet, the bathhouse will fill with an unpleasant odor during steaming. A wet insulation stops working. Aluminum foil, glassine, and polyethylene are used as vapor barrier materials. They are laid with an overlap, and the joints are taped with metallized tape.
To build the roof of the bathhouse, boards of 150x150 mm are taken. They are placed on edge and fastened together from above with a ridge beam. The height of the roof is 40 cm. The sheathing is laid from the ridge down. Ondulin, corrugated sheeting, metal tiles and other materials can be used as roofing.
To construct the ceiling of the bathhouse, they take wooden lining. Do not use wood from coniferous trees, as when heated they release resin, which can be harmful to health. It is also prohibited to sheathe the ceiling of a mobile bathhouse with sheets of fiberboard and chipboard: at high temperatures and high humidity they evaporate toxic substances.
Natural materials are not used to insulate the bath ceiling. For these purposes, it is better to use mineral wool.
The floor in the mobile steam room is arranged in the following order:
- A subfloor is installed with a slope towards the drain.
- Insulation and waterproofing are installed.
- The finished floor is constructed from hardwood.
- The drainage area is equipped with a siphon.
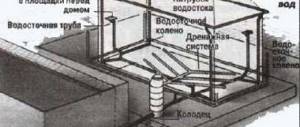
It is very important to provide for water drainage in the bathhouse. Since the volume of water used is small, a drainage system can be installed. To do this, it is necessary to dig a trench for water drainage, into which a pipe is laid, leading into a well with crushed stone, gravel and sand at the bottom. But most often they make pouring floors, where water flows directly onto the ground.
Documentation
All sorts of non-standard vehicles can arouse interest among traffic police officers, and quite justifiably so. The parameters and dimensions of any car/SUV/bus, even a converted one, must meet certain standards that ensure safe travel on the road. Therefore, before making a car bath, consider the height and side projections of the structure.
Another important point, which we already talked about a little above, is the maximum weight load of the car. If you make the bathhouse too heavy, it will immediately turn from mobile to sedentary. If you plan to use the autobath for business, then you need to register an individual enterprise (individual enterprise).
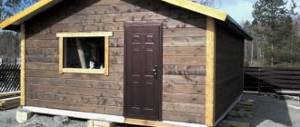
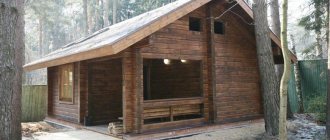
Do-it-yourself sauna in a kunga - photo
© Author: N. Zhuravleva
TOOLS FOR CRAFTSMAN AND CRAFTSMAN, AND HOUSEHOLD GOODS VERY CHEAP. FREE SHIPPING. THERE ARE REVIEWS.
Below are other entries on the topic “How to do it yourself - for a homeowner!”
- Mini sauna with your own hands - photos and drawings How to build a mini sauna I want to say...
- Barrel sauna - design and drawing How to build a “barrel sauna” Many owners of country houses...
- Mini sauna for one with your own hands SMALL SAUNA WITH YOUR OWN HANDS -…
- DIY house over the ice hole for swimming Hut over the ice hole Our dacha with…
- Do-it-yourself floor above the bathhouse - drawings and advice from an architect HOW TO BUILD A FLOOR ABOVE THE BATH Start...
- Stable folding trestles for the workshop with your own hands - photo and drawing Folding trestles for the workshop with your own...
- Do-it-yourself bathhouse terrace for pennies. Economy option for a terrace-extension to a bathhouse. With…
Subscribe to updates in our groups and share.
Let's be friends!
With your own hands › Bathhouse › DIY kung bathhouse (photo)
Drafting
The first step is to make a bathhouse design on paper or electronically. This will allow you to assess the proportionality of the future steam room and select building materials. Here it is important to take into account everything, down to the smallest detail - the total weight of the structure, the load on the wheel axle, as well as the power of the furnace.
The bathhouse sways when moving along Russian roads, so it is important to correctly design the centers of gravity - the stove and the ceiling. A step and a grate from the floor will be used as a counterweight.
If you have enough space in a mobile bathhouse design, then its design should include the following mandatory zones:
- steam room;
- shower;
- dressing room
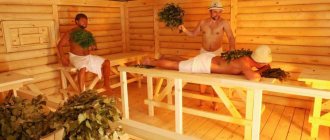
Steam room
As an addition, the steam room can be equipped with a dry closet, as well as tanks for cold/hot water. In this case, the mobile bathhouse can be used regardless of whether there is a body of water near the recreation area or not.
When planning a bathhouse on wheels, you should think about the presence/absence of window openings. They are sources of heat loss, so in any case, windows should have minimal dimensions. In principle, you can completely abandon windows in a mobile bathhouse. This is a fairly secluded place for relaxation and prying eyes will be unnecessary here.
According to safety regulations, doors in mobile bathhouses must open outward. This point is important to consider during the design process.
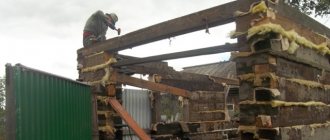
MADE YOUR OWN HAND FRAME AROUND THE KUNG
We started by raising the trailer and placing supports under it (six concrete blocks), leveling it horizontally. Then they built a frame around the KUNG and increased the length of the structure by 2 m. A veranda, also known as a dressing room and a rest room, was organized on the additional area. Then the roof was covered with metal tiles.
EVERYTHING YOU NEED FOR THIS ARTICLE IS HERE >>>
The trailer itself was divided into two parts: the combustion chamber and the steam room. The walls and ceiling were additionally insulated and an electrical wire was laid in a special (for wet rooms) metal pipe to provide lighting for the furnace and steam room. In the steam room, a window was cut out and glazed in advance; it was necessary for such rooms to have daylight. We also used the existing round hole for ventilation.
When insulating the inside, sheathing was attached to the walls, and insulation slabs were laid between the bars. The side of the slabs, sealed with foil, faces the inside of the steam room. Slats with a cross-section of 20 * 30 mm were stuffed on top and the lining was already attached to them: in the steam room they used linden, in the firebox they used spruce.
The outside of the bathhouse was insulated with polystyrene foam, covered with cement-bonded particle boards, covered with white paint for the exterior walls, and then decorated in a half-timbered style, like other buildings on our site.
Arrangement of stiffeners. Frame
The beginning of arranging a mini-sauna on wheels is the dismantling of unnecessary elements. Since the structure will experience constant load, a load-bearing frame should be made. Weld metal profiles onto its base and attach stiffeners.
When arranging a bathhouse in a trailer, the frame should be assembled from ready-made elements. You can make them yourself or order them.
So, the frame assembly process consists of the following steps:
- Assembling the floor from support beams and boards.
- Installation of the floor on the structural frame.
- Installation of wall frame.
- Assembly of walls.
- Installation of roof support beams and rafter elements.
- Cover the roof with a metal profile.
You can cover the roof only after installing the stove. The same is true for interior/exterior wall decoration.
Electric lighting should be made of heat-resistant wiring. To do this, use heat-resistant and waterproof lamps. But what if you want to make a mobile sauna in an old SUV? For example, such as URAL, ZIL or GAZ? The technological process is practically no different. The only thing is that the steam room is installed instead of the body. By the way, a truck base will make a more stable bathhouse than a car trailer.
Making a transportable sauna
The first idea. Bathhouse made of timber frame with plywood lining
Step 1. Initial floor arrangement
By default, the trailer does not have significant damage and we immediately begin rough floor preparation. If there are defects, we first get rid of them (clean off the rust, prime suspicious areas with a special compound for metal, weld holes, etc.).
Cleaning up rust Epoxy anti-corrosion primer
To simplify and speed up this stage of work as much as possible, we suggest using a special bitumen-based roll material. A diagram of its internal structure is shown in the image.
Insulation
The principle of use is as follows:
- The bottom protective layer in the form of a plastic film is removed. As a result, the self-adhesive surface is released;
- the material is distributed over the floor with an overlap of up to 30 cm on the walls. It is recommended to maintain the overlap between individual insulation strips at a level of 10-15 cm and additionally glue the overlap areas with construction tape.
The insulation is ready.
Prices for epoxy primer
epoxy primer
Step 2. Construction of the frame
Frame
You familiarized yourself with the diagram of a timber frame earlier. Before starting work, the timber must be impregnated with antiseptic and fire retardant agents - this will increase the wood’s resistance to rot and fire.
Fire protection, wood antiseptic
Work in this order:
- lay the lower crown and logs;
- install vertical racks;
- fix the upper jumpers;
- secure the intermediate beams.
We try to make the fixation of the lower beams as reliable as possible, using anchors or other powerful fasteners.
Impact anchor bolt
Installation of expansion anchor
Anchors
A ramp is visible from behind. The recommended tilt angle is from 15-25 degrees. To ensure this, you simply need to saw off the racks installed at the lower points of the slope to the required length.
Electric miter box Bosch
Helpful advice! Additionally, include in the given drawing intermediate jumpers connecting the side parts of the upper edge of the structure - they will increase the resistance of the roof to loads created by precipitation. At the same stage, you can mount jumpers for the subsequent installation of window blocks, so as not to have to cut out openings in the future, but you can give preference to the second option.
There are several options for fastening the beams. Firstly, you can use corners: you simply drill holes in the racks and lintels and tighten the products with bolts and nuts or self-tapping screws.
Example of using perforated fasteners
Secondly, you can glue the beams together and provide them with additional fixation using self-tapping screws or dowels. Usually the first option is preferred.
Step 3. Interior decoration
Sheathing scheme
Having erected the frame, we begin the interior finishing work. Let's start with the ceiling and walls. We'll do the floor last.
We will cover it with light euro-lining, for example, from aspen, fir, alder or pine.
Eurolining
There are no special tricks in attaching the lining. Since we are finishing a transportable bathhouse, and not a living space, we will take the simplest route and attach the lining to the frame beam using ordinary self-tapping screws, maintaining a 40-50-centimeter gap between the fasteners.
Helpful advice! We recess the caps of the screws into the base material a couple of millimeters and cover them with decorative plugs so as not to get burned on the hot metal in the future.
We sew up the ceiling and walls one by one.
Lining installation diagram
Panel fastening schemes
The floor is subject to insulation. Due to the fact that the total weight of the finished building is one of the primary values, it would be advisable to use lightweight material, for example, polystyrene foam boards, for thermal insulation. It is not necessary to fix them to the floor, but it is advisable. To ensure fastening, adhesive specially designed for this type of work is suitable. Prepare and use it according to the manufacturer's instructions.
An example of laying insulation boards
An example of fixing slabs with polystyrene foam glue
Example of replacing cracks
Important! The insulation boards are laid tightly to each other, without gaps. The joints of individual elements are taped with construction tape.
Expanded polystyrene does not absorb moisture, so there is no need to install a top waterproofing layer.
This material is also not subject to rotting, so you don’t have to think about installing ventilation gaps either. On top of the insulated floor we lay boards made of linden or lighter wood (we first impregnate the products with the already familiar antiseptic and fire retardant) and fix them to the beam of the lower crown and the joists at at least 4 points. We carry out the fastening in the already familiar way - with self-tapping screws, recessing the cap and then decorating with plugs.
Example of laying floor boards
Important! At the locations of the trailer wheels in the floor, we cut through holes according to the size of the wheels. We attach metal strips to the ends of the holes. In the process of using the bathhouse for its intended purpose, the floor can be given integrity using pre-installed hinged lids (preferable) or simply boards laid on top (easier, but worse).
Prices for eurolining
eurolining
Step 4. External insulation
Isolation diagram
In order to save the internal space of a transportable mobile bathhouse, we insulate it using the external thermal insulation method. We use, as noted, 5-centimeter mineral wool. If possible, it is recommended to take material with a foil layer - the thermal insulation will improve and the need to use a vapor barrier will be eliminated.
In order to reduce the total weight of the structure, we do not make cells from timber for mineral wool. We fill the gaps in the frame with the material (the insulation is easily cut into pieces of the required sizes) and provide fixation using wire or cord, stretching it along the walls with 50-centimeter intervals in height. We attach the wire/cord to the beam in any convenient way, for example, by tying it to pre-driven nails/screws.
We cover the mineral wool on top with moisture protection in the form of plastic film.
An example of a film fixed over mineral wool
We attach the material to the beam using a stapler with staples or small nails. Do not tighten too much - it may tear and slide at the fastening points. If it is necessary to make overlaps, we make them 10-15 cm wide and glue them with tape.
Step 5. Exterior skin
External cladding
For the external cladding, as noted, we use laminated plywood.
Moisture-resistant laminated plywood
We make the necessary cuts with a jigsaw, hand saw or other suitable tool.
An example of sawing a plywood sheet
We fasten the sheathing using a method already familiar to us from the stage of arranging the interior decoration, or an even faster and more convenient method, involving the use of a special tool - an electric riveter.
Cordless riveter
We maintain a small step between fasteners - up to 300-400 mm. We adjust the individual cladding elements so that there are no gaps between them. To improve the quality of the joints, you can go over them with a sealant.
Prices for laminated plywood
laminated plywood
Step 6. Installation of windows and doors
Installation of windows and doors
We choose the material of manufacture, dimensions and other significant characteristics of windows and doors at our discretion.
It is better to entrust the installation of windows to professionals, but if desired, you can make the doors yourself, following the recommendations from the previously published instructions.
Step 7. Approve the internal layout
We approve the internal layout
The transportable bathhouse we are building consists of 2 rooms: a small (about a meter) dressing room and a steam room (occupies all the remaining space).
We approve the design of the internal arrangement of the steam room
Planning a steam room so compact that it is convenient, comfortable and safe to use is not the easiest task. We thought for a long time and as a result we came to exactly the same option as in the image.
The following has been done here:
- A full-size (about 1.7-1.8 m) shelf is installed along the left wall of the steam room;
- the right corner near the front wall is reserved for installing the stove. Recommendations for this event will be provided in a separate section;
- There is a seating shelf along the right wall.
We will not describe the procedure for making bath shelves - the topic is covered in great detail in the corresponding manual.
We figured out the procedure for constructing and finishing a transportable mobile bathhouse. For completeness, we suggest that you familiarize yourself with a couple more great ideas.
Idea two. More traditional
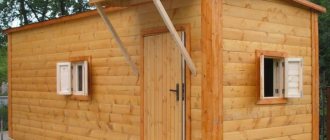
In this option, the frame is sheathed with a material more familiar to a wide range of developers - boards.
Recommendations for preliminary preparation of the trailer and construction of the frame remain similar to the previous idea. Here you are invited to view “real” photographs of the frame being built. The image shows the previously mentioned openings above the wheels.
Example of openings above the wheels
An example of a frame under construction
Wheel opening
It is proposed to make the roof gable.
Roof construction
We set the required slope according to the already familiar scheme - by ensuring a difference in the heights of the racks at different points of the slope.
Photo of the frame under construction
Recommendations regarding rafters, fasteners and other related nuances remain the same.
In this case, it was decided to use a board to cover the frame of the bathhouse. A material 3-4 cm thick, made of linden, alder, pine or other light wood, is suitable. Fastening is carried out according to the already familiar scheme, i.e. screws, nails, etc.
Cladding and roof
The roof is insulated with glassine (attached similarly to the previously discussed film protective materials).
The owner should decide for himself regarding the finishing material. The main thing is that the coating is light in weight, easy to install and easy to maintain. Metal tiles meet these criteria. When covering a compact transportable bath, the material consumption will be minimal, so you will not incur significant financial costs.
Large range of colors for metal tiles
Metal tile sizes
Installation of metal tiles How to attach metal tiles
The first sheet of metal tiles is laid at the edge and carried down 4 cm beyond the roof eaves. The sheet is aligned along the end of the slope. The top of the first sheet is currently secured with one self-tapping screw. The next sheet is laid with an overlap in the wave on the first one (when installing the roof in the direction from right to left) or the wave of the 2nd sheet is placed under the first one (when installing the roof from left to right). The elements are fastened together overlapping each other so that the metal tile sheets are not fixed to the sheathing and are able to freely rotate together in relation to the self-tapping screw, which ensures the fixation of the 1st sheet.
If you need to cut the sheet, do it with metal scissors or a jigsaw. The grinder is more convenient and productive in this regard, but manufacturers do not recommend using it, because... rapid rotation of the cutting disc leads to a significant increase in temperature, which causes the metal tiles to deteriorate. If you cannot do without a grinder, cut very carefully, making sure that the material does not overheat, and finally, be sure to cover the cut areas with anti-corrosion paint.
Tools for installing metal tiles
How to cut metal tiles
The sheets are laid according to the described technology until the entire planned space of the roof slopes is filled. The sheets are secured from below with self-tapping screws through one wave into its deflection.
From above, the junction of the slopes is closed with a metal tile ridge, fixed with self-tapping screws. The previously open ends of the ridge are closed with special plugs that prevent precipitation from penetrating into the under-roof space.
Ridge installation
Installed skate
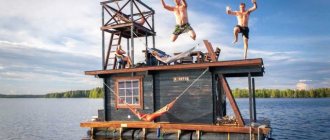
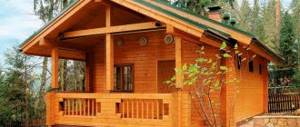
Sauna on wheels
Sauna on wheels, front view
Sauna on wheels, construction
Bath decoration
The photo shows additional stiffening ribs. Make them from 15x15 or 15x10 timber, having previously cut out the inner part of the wood in accordance with the parameters of the corners of the transportable bathhouse. Fix the corner reinforcements with self-tapping screws or other suitable fasteners.
Next, the internal arrangement of the transportable bathhouse is carried out in the sequence already familiar to you from the previous idea.
Prices for metal tiles
metal tiles
Video - Installation of metal tiles
Idea three. Semi-collapsible bathhouse
An option for real pros. If you wish, you can take this project as a basis and entrust the translation of the idea into reality to a third-party specialist, or, having sufficiently trained and gained experience, assemble a semi-dismountable transportable bathhouse on your own.
While traveling, i.e. When assembled, the structure will look something like this.
Semi-collapsible bathhouse
Upon arrival at the location, the wall extensions are temporarily moved away from the main part of the structure.
Bathhouse in analysis
The roof rises up on telescopic tubes.
Roof with telescopic tubes
Wall extensions are placed in the required places, i.e. in the space between the lower parts of the walls and the roof. The dimensions are still given as an example.
Dimensions
For greater reliability, the structure is tightened with approximately the same ties.
Ties
The advantage of this solution is obvious: while the bathhouse is being transported to its location, the structure has a reduced height, which reduces windage and significantly reduces the risk of the building overturning.
The only point is that you need to choose the appropriate wall material. In this case, the best option would be elements made using frame-panel technology or based on timber with cladding. We see it this way: a frame is made of timber, the required insulating elements are placed in it, after which the structure is sheathed on all sides with finishing materials. If you wish, you can use your own ideas and ideas.
Thermal insulation
In order for a bathhouse on wheels to be reliable, it must be properly insulated. The optimal width of the thermal insulation cake for a mobile structure is 15 cm. The sequence of thermal insulation is:
- Installation of sheathing made of beams with a cross-section of 6 cm.
- Laying vapor barrier and mineral wool.
- Heat reflector flooring, such as foil.
- The joints of the foil should be sealed with tape.
- Installation of counter lathing.
If you are making a bathhouse in an old truck, then thermal insulation should be applied to the walls. In all other cases - on a metal frame covered with wood.
Interior decoration
The interior lining of a bathhouse on wheels is no worse than its stationary counterpart. After thermal insulation, finishing and decorating the interior of the bathhouse should be carried out. For these purposes, it is best to use lining made of linden, alder, aspen, etc. A block house and planed boards are also suitable. For lining the dressing room - coniferous wood, for the shower - tiles, preferably non-slip, for floors - tongue and groove boards.
In the interior you should place:
- Folding/pull-out shelves.
- Tanks with hot/cold water (if space allows).
- A bench for rest.
- Shower stall/combi toilet.
- Folding table.
- TV/cassette player.
- A small chest of drawers with plastic dishes, cosmetics and towels.
- Additional accessories upon request (brooms, hourglasses, etc.).
To prevent fixed products from falling during movement, they must be properly secured.
Design options for transportable baths
In this regard, the choice is not as impressive as in the case of traditional stationary buildings. The available options are discussed in the table.
Table. Design options for transportable mobile baths
| Design option | Description |
Large mobile sauna from a ready-made trailer | In this case, the owner acted quite smartly: a ready-made trailer was allocated for the steam room. The design widely used in Soviet times with the inscription “People” is ideal - such transport was used for transporting military personnel, employees of various enterprises, etc. The advantages are obvious: - savings on materials for building the box; - higher speed of work execution. The task comes down to the internal improvement of the trailer in accordance with the characteristic features of the steam room. It is important to take into account one important nuance: the trailer structure is made of metal. This material is highly susceptible to temperature deformation. To avoid the inconveniences associated with this moment, you need to perform high-quality thermal insulation of the structure. |
Spacious transportable steam room made of timber/logs | Don't have a suitable ready-made trailer for transporting people? Please take a look at this option. A regular car trailer is used. The steam room box is built from a log house (for powerful vehicles with appropriate trailers) or timber (a frame made of light timber with cladding, suitable for transportation by passenger vehicles). The dimensions of the finished room depend, firstly, on the size of the existing trailer and the permissible loads on it, and secondly, on the capabilities of the vehicle. If you want to have a large mobile bathhouse at your disposal, it is better to give preference to vehicles such as KAMAZ, GAZ and other trucks - their power is enough to transport spacious buildings. The only thing is that there will still be height restrictions. In practice, it is not recommended to make such baths with a height of more than 180-190 cm - it will be difficult to maintain the centers of gravity, which will increase the risk of the structure overturning during transportation or when used at the location. Separate information about centers of gravity will be given below. |
Compact transportable sauna | In the absence of a truck and/or a suitable trailer, you can make a compact bathhouse measuring up to approximately 2x3 m. Such a design can be transported by an ordinary passenger car without much difficulty. True, you can’t go to such a steam room with a large group - the available space is enough for a maximum of 2-3 people, and this is perhaps the only drawback of such a bathhouse. |
Furnace installation
The best option for a stove for a mobile sauna is to install a potbelly stove with a welded side, which is adapted for heating water. It is also important to arrange a platform for the heater. For safety reasons, the firebox must go outside. This will also help save space inside the bathhouse, since firewood will not take up space in the room. In addition, smoke will come out. After the sauna warms up to +60ºС, you can get down to business.
When moving the sauna, the stones for dry steam may roll and fall, as a result of which the sauna equipment may be damaged. This problem is eliminated if flat stones are drilled and strung on strong metal wire. So, you can transport them without problems.
Ceramic insulators often replace the familiar filling of the heater. They are easier to put on a wire than stones, and they produce no less steam than cobblestones.
Mobile baths: possibilities for self-construction
For use in a summer cottage, a transportable sauna made of timber would be an excellent option. Depending on the type of sauna you choose, you will need a certain amount of money and time. But in any case, this is an excellent saving option. In addition, not all purchased versions of mobile baths are standards of perfection. And by doing everything yourself, you have the right to adjust the work, planning the optimal sizes for the steam room and washing department.
The type of stove has a huge impact on comfort. Since the bathhouse is not permanent, it must be able to provide the required level of heating. Having a welding machine and the skills to work with it, you can make a good potbelly stove, with a built-in water tank and a place for laying stones.
Exterior finishing
If you want to make a cozy bath not only inside, but also outside, then use wooden siding as cladding. Agree that plastic banners with painted logs are completely devoid of comfort. If you add carved frames on small windows, cute steps and kerosene lanterns to the wooden cladding, your autobath will be truly charming.
For safety reasons, the door to the bathhouse should be installed so that it opens not inward, but outward.
Safety precautions
“Maybe it will work out” - we have probably heard this original Russian phrase, which allows us to violate safety regulations with a clear conscience, many times already. However, the same cannot be said about the ability to steam while the autobahn is moving. This kind of “maybe it will cost” can cost you too much.
You can only take a steam bath in the bathhouse parking lot. This way, you will avoid unnecessary injuries and burns.
The movement of the autobath can only be combined with the heating of the stove under supervision. This will allow you to warm up the bathhouse to the required temperature by the time you arrive at the place of temporary deployment.
Installation of a trailer sauna at the location
If we are talking about the temporary installation of a trailer bathhouse, then the first step is to uncouple it from the vehicle. In order for the bathhouse to be stable, you need to strengthen it with a supporting leg. The platform will rest on it. For better stability of the structure, install 3 additional supports. Thus, to prevent the trailer sauna from swaying, you need to install it on 4 support legs.
After this, you can fold back the side of the trailer and lower the ladder. All this takes no more than a quarter of an hour.
View from the inside
This is where the actual recommendations for the construction and arrangement of the autobahn end. If you have experience in installing a mobile sauna, then share it with us and our readers. Your additional recommendations will be useful to us. Do you have any questions about building a mobile sauna? Ask them to a specialist working on the site.