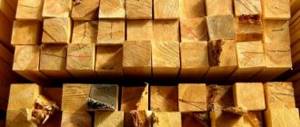
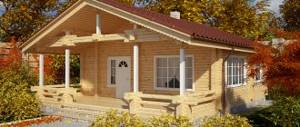
Houses and dachas made of timber and logs are no longer considered as a sign of failure, but on the contrary, people strive for the purity of nature, and such buildings can even be compared with elite ones (of course, in a certain sense). Now we will look at how you can independently build a log house from 150x150 mm timber with a foundation and roof. Of course, we will focus on assembling the walls, and in addition there is a video in this article on this topic.
Decent people get a decent home!
Prices for log houses
| LOG SIZE | LONG PARTITIONS | LOBBY PRICE | |
| Not planed, rub. | Planed, rub. | ||
| 6 X 4 | 187.000 | 213.000 | |
| 6 X 6 | 243.000 | 273.000 | |
| 6 X 7 | 285.000 | 320.000 | |
| 6 X 8 | 305.000 | 343.000 | |
| 6 X 9 | 1 | 340.000 | 378.000 |
| 7 X 7 | 305.000 | 343.000 | |
| 7 X 8 | 2 | 358.000 | 388.000 |
| 7 X 9 | 2 | 396.000 | 430.000 |
| 8 X 8 | 2 | 405.000 | 450.000 |
| 9 X 9 | 2 | 448.000 | 498.000 |
| 9 X 10 | 2 | 456.000 | 525.000 |
| 10 X 10 | 2-3 | 505.000 | 565.000 |
| 10 X 11 | 2-3 | 530.000 | 590.000 |
Basic Equipment. Price includes:
- Log house made of timber with a section of 150 x 150 mm.
- Internal partitions made of timber 150 x 100 mm.
- Floor and ceiling beams 150 x 100 mm.
- Subfloor on the first floor.
- Edged boards 25 x 150 mm.
- Gable roof: rafters 50 x 150 mm.
- Hemming of approaches and cornices (board 25 x 150 mm.)
- Lathing board 25 x 150 mm.
- Delivery to the site (no more than 80 km from the Moscow Ring Road)
Advance payment is negotiable
Why this size?
This question is often asked by beginners who are just beginning to take their first steps in mastering the dacha infrastructure. Timber of this size of various coniferous and hardwood species has a number of advantages:
- can be used for the construction of both walls and as a floorboard or log;
- more durable than analogues of a smaller cross-section, and has low thermal conductivity;
- it is universal, so it is often used at the installation stage of windows and doors;
- there are no additional costs for finishing materials;
- perfectly withstands temperatures down to minus 30 degrees.
To accurately determine the required amount of material, you need to focus on the technical design of the bathhouse, taking into account the length of the walls, partitions, height of the structure, minus the size of the openings for windows and doors. It is calculated that with a cross-section of 100x150x6000 mm, 11.11 beams fit in a cube.
Prices for houses made of profiled timber
| LOG SIZE | LONG PARTITIONS | LOBBY PRICE |
| Cost of a log house made of profiled timber with natural humidity, rub. | ||
| 6 X 4 | 0 | 252.000 |
| 6 X 6 | 0 | 296.000 |
| 6 X 7 | 0 | 350.000 |
| 6 X 8 | 1 | 430.000 |
| 6 X 9 | 1 | 450.000 |
| 7 X 8 | 2-3 | 490.000 |
| 7 X 9 | 2-3 | 530.000 |
| 8 X 8 | 2-3 | 530.000 |
| 8 X 9 | 2-3 | 560.000 |
| 9 X 9 | 2-3 | 590.000 |
| 9 X 10 | 2-3 | 640.000 |
| 10 X 10 | 2-3 | 690.000 |
| 10 X 11 | 2-3 | 750.000 |
Basic Equipment. Price includes:
- Log house made of timber with a section of 145 x 145 mm.
- Internal partitions made of timber 90 x 145 mm.
- Floor and ceiling beams 150 x 100 mm.
- Subfloor on the first floor.
- Edged boards 25 x 150 mm.
- Gable roof: rafters 50 x 150 mm.
- Hemming of approaches and cornices (board 25 x 150 mm.)
- Lathing board 25 x 150 mm.
- Delivery to the site (no more than 80 km from the Moscow Ring Road)
Advance payment is negotiable
How to build a bathhouse from boards
When constructing buildings using frame technology, not only boards can be used, but also materials such as plywood or OSB (oriented strand board). The basic principles of construction depend on their choice.
But in addition to the sheathing, you will need materials for steam, hydro and thermal insulation. How to choose them?
Frame wall arrangement diagram
Selection of materials
- For the frame, you can take well-dried timber or boards with a cross-section of at least 50x100 mm.
- For external cladding - coniferous boards (pine, larch).
- For internal cladding - wood with low thermal conductivity (linden, aspen).
- When heated, the vapor barrier should not emit harmful substances or odors, so traditional roofing felt and roofing felt cannot be used. Stop your choice on modern vapor barrier films.
Advice. Foil films are the most effective. They not only prevent steam from passing under the skin, but also reflect back warm air.
- Thermal insulation is the main material that ensures the preservation of heat in a heated bath, but does not interfere with air exchange in it. It is recommended to use moisture-resistant insulation - stone (basalt) wool. Unlike many other materials, it does not burn and does not emit harmful substances when heated.
Basalt wool can be in rolls or sheets
Construction
If you decide to learn how to build a bathhouse with your own hands from boards, then keep in mind that the difference from construction from other materials lies only in the design of the walls. Although, as mentioned above, the foundation can also be lightweight - columnar.
Base trim
Installation of the bathhouse begins with the installation of a rigid base frame - the base for the frame. For it, use 15x15 cm timber or boards with a cross section of 50x100 (150) mm laid on edge in 2-3 rows. Before installation, they must be impregnated with antiseptic solutions.
Advice. If you use boards rather than timber, it will be easier for you to connect them in the corners and make grooves in the trim for installing the vertical posts of the frame.
Trimming of three rows of boards
The photo shows the herringbone end connection and sawn grooves. When working with timber, installing these elements will require more labor, experience and special tools (jigsaw, chainsaw).
After assembling the strapping, it is laid on the foundation support columns with gaskets made of roofing felt or roofing felt and leveled horizontally. If necessary, the level is raised using wooden pads or the required number of layers of roofing felt. The corners of the harness should rest on the posts, so do not make mistakes with the dimensions when making it.
Racks and top trim
After mounting and fastening the lower trim and making grooves in it, the racks are installed. The step between their axes is usually 60 cm; subsequently, it will be convenient to lay sheets of insulation for a bathhouse of the same width in these cells.
It is necessary to determine in advance the location and size of window and door openings in order to first install the framing and corner posts, then it will be easier to calculate the position of the intermediate ones.
Note. Vertical racks must also be installed in places where internal partitions adjoin the main walls.
To prevent the already mounted racks from falling while the others are being installed, they are additionally attached to the bottom trim with temporary jibs, while simultaneously checking the verticality.
At the upper ends of the racks, they are fastened together with a top strap, which is made from a fifty-fifty board laid flat.
Upper harness
Despite the apparent simplicity, the described work should be done very carefully in order to obtain right angles and maintain the vertical and horizontal level of the corresponding structural elements.
Insulation and sheathing
Not only the walls, but also the ceiling are sheathed and insulated in the bathhouse.
The instructions for the construction of frame baths require the following sequence to be followed when installing an insulating pie:
- First, the outer cladding of the frame is done with boards. To give the structure rigidity, it is made in the horizontal direction. But the boards dry out over time and gaps may appear between them, so they should not be fastened end-to-end, and it is recommended to lay a layer of bathhouse waterproofing under the skin.
External cladding option - overlapping
- The next stage is installation of insulation. It fits between vertical posts and does not require additional fastening, since the clean distance between them is slightly less than the width of the insulation, so it fits tightly in the cells.
- The vapor barrier is installed on top of the insulation, close to it. For fastening, thin slats and a construction stapler with staples are used. The canvases are overlapped and must be taped with a special tape. It is necessary to seal all random holes with it, since the vapor barrier layer must be continuous.
Attach vapor barrier from bottom to top
Attention! The vapor barrier film should protrude 10-15 cm below the junction of the wall and the floor so that condensation flows down it without falling on the wooden elements.
- The internal lining is made vertically from wooden lining. There should be a ventilation gap between it and the vapor barrier layer.
The ceiling is installed in the same way, but to reduce heat loss, insulation is laid on it in two layers.
Ceiling insulation
Prices for log houses
| SIZE | Log house price | |||
| Basic cost of the kit | Fifth wall | Chopped gables | Planer stitching | |
| 3x4 | 140.000 | 15.000 | 15.000 | 20.000 |
| 3x5 | 155.000 | 15.000 | 15.000 | 20.000 |
| 5x4 | 175.000 | 18.000 | 15.000 | 20.000 |
| 6x4 | 195.000 | 19.000 | 15.000 | 20.000 |
| 5x6 | 277.000 | 25.000 | 20.000 | 25.000 |
| 6x6 | 295.000 | 26.000 | 25.000 | 30.000 |
| 6x7 | 315.000 | 27.000 | 30.000 | 30.000 |
| 6x8 | 365.000 | 29.000 | 30.000 | 35.000 |
| 6x9 | 380.000 | 30.000 | 35.000 | 35.000 |
| 7x7 | 365.000 | 32.000 | 35.000 | 45.000 |
| 8x7 | 385.000 | 35.000 | 40.000 | 45.000 |
| 7x9 | 440.000 | 40.000 | 45.000 | 50.000 |
| 8x8 | 445.000 | 45.000 | 45.000 | 55.000 |
| 8x9 | 480.000 | 47.000 | 50.000 | 60.000 |
| 8x10 | 510.000 | 47.000 | 55.000 | 65.000 |
| 9x9 | 515.000 | 50.000 | 60.000 | 70.000 |
| 9x10 | 550.000 | 50.000 | 60.000 | 70.000 |
| 10x10 | 570.000 | 63.000 | 70.000 | 80.000 |
| 10x11 | 580.000 | 63.000 | 85.000 | 87.000 |
| 11x11 | 600.000 | 70.000 | 90.000 | 100.000 |
| 12x11 | 635.000 | 75.000 | 90.000 | 100.000 |
| 12x12 | 680.000 | 85.000 | 97.000 | 105.000 |
Basic equipment. Price includes:
- The height of the log house is 3 m.
- Antiseptic treatment.
- Floor and ceiling beams (carriage 150 mm).
- Rafter system (beam 50 x 150 mm).
- The gables and roof are clapboard.
- Roof sheathing (board 25 x 150 mm).
- Hemming the approaches and cornices - lining.
- Roof covering with roofing felt.
- All consumables (nails, staples, moss).
Advance payment is negotiable
Properties of lumber
The popularity of baths of this type is understandable.
Advantages
- If a bathhouse is built from timber 100 by 100, or slightly thicker, it gives the walls absolute evenness with a small thickness. Consequently, your steam room will be more spacious and tidy.
- It is easier to construct buildings from timber than from logs. For example, it does not need to be trimmed and adjusted by hand.
- Timber log houses shrink minimally.
- Construction will be easy. Therefore, there is no need to build an expensive foundation.
This steam room is built very quickly.
- Buildings made from such timber look aesthetically pleasing.
- Low price when compared with stone-like materials.
- The timber is environmentally friendly and makes it possible to create the right microclimate in any building.
Features of timber and its use
Glued laminated timber.
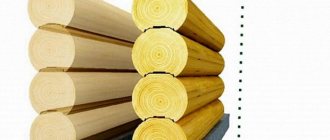
The ease of installation of the log house is ensured by the specific properties of the timber.
- Its raw materials are logs. They are hewn on all four sides.
- This lumber is impregnated with antiseptic compounds. They increase the service life of the log frame.
- Manufacturers produce a special type of timber - laminated veneer lumber. This is the most expensive and high-quality type of material, ensuring rapid construction.
- Typically, timber harvesting for timber is carried out during the cold season - from December to March. Such raw materials are of higher quality than summer ones.
Note! After the wood has been harvested, it should rest for about 40/45 days. The trunks are freed from the bark, about 10 cm of it is left at their ends. The material is stored in stacks. The gaps between the trunks should be 5 cm, between their rows 10 cm, the height of the stacks from the ground level should be 20 cm.
Foundation cost
The cost of the foundation includes the cost of the work performed to construct the foundation and materials.
| SIZE | PRICE | SIZE | PRICE |
| 3 X 4 | 83.000 | 6 x 10 | 155.000 |
| 3 X 5 | 88.000 | 7 x 7 | 141.000 |
| 4 X 4 | 87.000 | 7 x 8 | 150.000 |
| 4 X 5 | 100.000 | 7 x 9 | 155.000 |
| 4 X 6 | 107.000 | 7 x 10 | 167.000 |
| 4 X 7 | 115.000 | 8 x 8 five-walled | 190.000 |
| 5 x 5 | 107.000 | 8 x 9 five-walled | 200.000 |
| 5 x 6 | 115.000 | 8 x 10 five-walled | 206.000 |
| 5 x 7 | 118.000 | 9 x 9 five-walled | 215.000 |
| 5 x 8 | 130.000 | 9 x 10 five-walled | 222.000 |
| 6 x 6 | 120.000 | 10 x 10 five-walled | 237.000 |
| 6 x 7 | 130.000 | 10 x 11 five-walled | 240.000 |
| 6 x 8 | 140.000 | 11 x 11 five-walled | 249.000 |
| 6 x 9 | 147.000 |
Price includes:
- Digging a hole 70 cm deep, 40 cm wide.
- Laying a 20cm sand cushion.
- The total height of concrete pouring is 90 cm (50 cm in the ground, 40 cm above ground level).
- Knitting reinforcement (2 layers).
- Production of formwork.
- Dismantling the formwork.
- All consumables: concrete, sand, reinforcement, formwork boards, ventilation windows (PVC pipes).
Construction stages
The construction of a bathhouse, like any other capital building, must begin from the foundation. If the terrain allows, then a more economical columnar foundation is chosen; if the soil is soft or loose, a strip foundation is poured. The width of the base must exceed the thickness of the timber by at least 10 cm.
After waterproofing and drying of the foundation, the stage of erecting crowns and walls begins. Moreover, it is important not only to lay the timber correctly (loosely to each other, without distortions), but also to insulate it efficiently. To do this, natural heat-insulating materials are laid horizontally at the joints, which do not rot and allow the walls to “breathe.” These include tow, felt, ecowool. After shrinkage, the joints are additionally caulked with jute or linen.
Now it's time to lay the roof, do the interior finishing, electrical wiring and communications. The final chord is the preparation of furniture for a bathhouse made of soft wood.
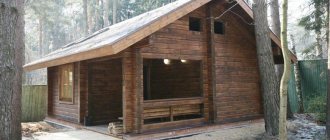
How to choose a project
Cobblestone bathhouse with attic.
A standard bathhouse made of 10 by 10 timber or a slightly thicker material can be equipped according to a standard design.
- Typically, they involve the construction of three main rooms: a locker room/dressing room, a washing room and a steam room.
- The structure, at your choice, can be built on one or two floors, or the latter can be replaced with an attic. In addition/, the building can be supplemented with a balcony, veranda, terrace.
- To facilitate wooden construction, the instructions advise constructing the lower floor entirely from timber, and making the attic or second tier frame.
General requirements for lumber
It has been proven by practice that any product made according to the principle of “molding from what was” will certainly be of appropriate quality. A frame house, a place where people will live all year round, must be made without a hitch, therefore the board for frame house construction should not be easily cut, but calibrated.
Ideal shapes of calibrated boards
Why calibrated is better
It is distinguished from planed boards by its ideal geometry, because it is no secret that when ordering edged boards with the required parameters, the customer is not immune from the “creative” approach of the supplier. The width and thickness can go negative from the desired value to ten centimeters, not to mention areas of rot, warping or cracks, which are unacceptable according to GOST 8486-86.
After processing the usually crookedly cut ends, up to 10 cm are lost on each board, which amounts to a certain amount on the scale of the whole house. Crooked boards of the lower frame on the foundation threaten to distort the floor and the entire building.
You should not use a cheap, unplaned board. You will waste money on fire protection agents because they are difficult to apply to rough surfaces. And after finishing work, the interior space will be lost.
Unplaned boards are not the best material for a home
Dry board – healthy home
A high-quality construction mat should have a humidity of 12 to 15%, which can only be achieved by drying in a chamber by heating and blowing, so that the board does not warp. The process, which takes several days, adds up to 1,500 rubles to the cost of each cube of material.
For example, the price of 1 m3 of edged board with a moisture content of up to 20% and dimensions 15x150x6000 mm will be about 6 thousand rubles, a calibrated “prepared” board according to all the rules will cost twice as much.
If time does not push you, you can “make” boards of excellent quality yourself, following simple rules:
- wood cut down in winter contains a minimum of moisture;
- store in stacks protected from bad weather and sun;
- Place coniferous wooden blocks between the boards so that the lower surface also dries out;
- The storage area must be ventilated lengthwise and crosswise.
Note! Depending on the thickness of the board and the climate zone, the process can take from one and a half weeks to 2 months.
Ideal option for drying boards outside
It is undesirable to build a house from boards of natural moisture for permanent residence, because even at the joints of several boards, cracks will inevitably form over time with all the ensuing consequences.
Although there is a technology for building from such material, it is suitable for summer cottages. First, a load-bearing frame and roof structure are erected, which are left to dry in this form until the end of summer, and only then the construction ends and the house is insulated.
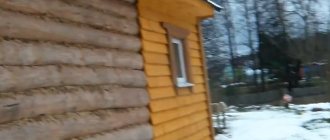
Construction of a log house
First, the construction of walls is carried out.
Types of base
Columnar foundation for a bathhouse.
When constructing a light bathhouse from 100 by 100 mm timber, two types of bases are optimal.
- Columnar bases. Brick, stone, concrete, wooden supports are placed along the perimeter of the steam room, its corners and at the points of intersection of the bathhouse partitions with load-bearing walls. The step between the pillars should be about 1.5 m. To increase strength, the supports need to be reinforced and protected with waterproofing between the foundation plinth and the first cobblestone crown. In this case, you can use liquid bitumen mastic or roofing felt.
- Laying a strip base consists of digging a trench, constructing formwork of the required width and filling it with concrete. Optimally, the height of the ground part of such a foundation is 30/50 cm. Such a foundation also requires reinforcement and waterproofing of the walls.
Wall assembly
The assembly of timber walls is very simple.
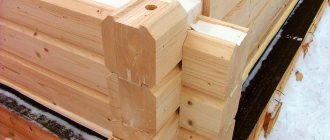
- The first crown (row) of beams is the basis of the entire log house. The durability and quality of the entire building depends on the literacy and accuracy of its installation.
- Having laid the first row, you can begin the actual construction of wooden walls. First, the beams are adjusted to their length. Then grooves are cut out on their opposite sides to connect the elements at the corners of the frame.
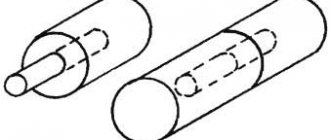
Note! It is undesirable to use metal nails and screws when fastening beams. It is best to replace them with wooden dowels (wedges). They are driven into pre-made holes.
- The connection goes like this. The upper beam is drilled completely, the lower beam is drilled halfway. Next, the upper beam is removed and dowels are driven into the holes until they stop. The insulation for the bathhouse is laid, then the timber is installed back.
- It is advisable to use natural materials as a heat insulator - moss, flax, jute. They need to caulk the walls from the inside and outside.
Preparing the log house for the shrinkage period
The inevitable shrinkage of walls is influenced by such factors.
- Type of timber used and its dimensions. Profiled analogs shrink by 2.5/6 cm. Glued material shrinks by 2 cm or less.
- Total area of the building. A two-story steam room or one with an attic will settle more than a one-story building.
- Type of lumber and its moisture level. The larger it is, the more significant the shrinkage.
- Steam room location. Everything matters here: whether it is built in the shade, in the sun, on a flat area or with uneven terrain.
Taking into account all these points, a bathhouse made of 100x100 timber should be built with your own hands, including them in the project.
For example: keeping shrinkage in mind, you need to fix the rafter system only in some places. So, it will shrink in proportion to the corresponding process in the load-bearing walls.
Here's how to prepare a log house for shrinkage: The top of the crowns are covered with boards having a thickness of 4 centimeters. Slate is mounted on top. When about six months have passed, you can begin facing work.