Ceramic tiles are not widely used in residential buildings due to expensive installation. The fact is that natural tiles are very heavy, and the load on the roof is many times greater than the pressure that comes from metal roofing analogues. However, those owners of private houses and cottages who have chosen ceramic tiles will receive a durable roof for at least a hundred years.
Flat roof technology and materials
A flat roof has a smaller area than a pitched roof, and for this reason alone it is cheaper. Money is also saved and, due to the absence of a rafter structure, roll waterproofing materials themselves have a lower cost than tiles or metal.
For domestic private housing construction, flat roofs are not typical. Many homeowners consider them to be attributes of industrial architecture and high-rise buildings. However, as soon as you move a little further west, for example, to Poland, cottages with flat roofs appear in large numbers. And this is not surprising, because the Poles are the closest neighbors of the Germans, and they know a lot about saving. In Germany there really is a huge number of private houses of post-war construction with a flat roof.
Recovering from the devastation, the Germans were forced to count every penny. And although houses with flat roofs were not traditional for them at that time, they began to build them. It was primarily the economic advantages that had an impact. Construction time was also reduced due to less complex and labor-intensive installation.
There are also functional advantages of flat roofs. First of all, this is the rational use of the space of the upper floor, due to the absence of inclined slopes. Additionally, the horizontal design of the roof makes it easier to inspect and repair. A flat roof can be made usable: arrange something like a terrace there, place air conditioning units or supply and exhaust ventilation units.
As for the climatic factor, the only limitation for building a flat roof may be regions where heavy snowfalls are typical. There it is better to have a pointed pitched roof, like you see in the Alps.
Types of tiles
One of the most popular is metal tiles (metal tiles). It is characterized by increased strength and ease of installation. In addition, this version of the tile can be used not only for new buildings, but for the reconstruction of old ones. However, its soundproofing qualities are very poor.
Bitumen tiles. Rubber bitumen coating perfectly adapts to various uneven conditions, does not fade, and has excellent sound insulation properties. The only significant drawback is installation; it is very difficult to perform without special training.
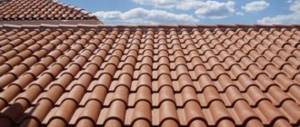
Ceramic tiles. This is the most expensive roof finishing option. But it's definitely worth it. The service life of ceramic tiles is one hundred years or more. In addition, it has unique characteristics: it is resistant to ultraviolet radiation, practically does not get hot in the sun, and does not react to temperature changes.
Basic recommendations
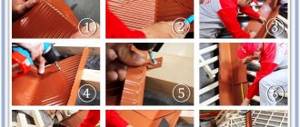
Once the decision has been made to complete the roof of the house using soft tiles, you need to think about laying it yourself. Installation is not difficult, but the technology has some peculiarities. The following recommendations for performing the work can be given:
Roofing pie for soft tiles
After purchase, the material is stored indoors. The sheets are laid horizontally in pallets, the height of which is no more than 16 rows. The lining carpet, which is used for priming and leveling the surface under the tiles, is placed in a vertical position for storage.
To create favorable temperature conditions in the under-roof space, you will need to perform thermal insulation. The type of insulation is selected depending on the preferences and financial capabilities of the home owner. Most often, mineral wool is installed
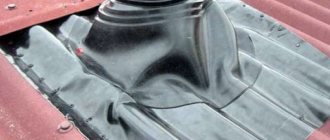
The technology for laying this material presupposes the presence of reliable waterproofing and vapor barrier. In addition, to remove liquid vapor from the surface of the insulation, a ventilated air gap is provided between it and the roofing, the width of which is on average 5 cm.
When purchasing roofing material, it is important to pay attention to the shipment of goods. The roof will look better if you use materials made at one time in one place. In this case, an exact match in color and physical characteristics can be guaranteed.
Installation of soft tiles is not carried out at subzero temperatures
This is due to the fact that the material becomes brittle in the cold and can easily be damaged when secured into a pie.
To lay the material yourself, the minimum slope angle should be 15 degrees. Installation with less does not guarantee waterproofing, since the liquid moves rather slowly over the surface and can easily flow into small gaps. In this case, it is worth considering the rule that for bitumen the roof slope cannot be too large and remember that the more the roof is sloped, the more material will be required per pie.
Do-it-yourself installation of soft tiles is carried out without the use of a torch. This material does not belong to the class of weldable materials. For additional fastening (in case of strong wind loads), special adhesive solutions are used. Peel off the transparent protective film from the inner surface immediately before placing it on the cake.
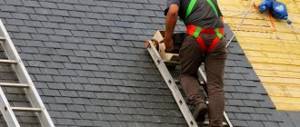
When doing work with your own hands, it is important to remember that you are not allowed to walk on the roof without special equipment in sunny, warm weather. This is because the material melts slightly when exposed to sunlight, and the person doing the installation may leave shoe marks on the surface that cannot be removed without replacing part of the coating.
Solid material is used as a base for the tiles. The pie may include a continuous sheathing or a sparse one, followed by laying moisture-resistant plywood on it. Installation directly on the insulation is prohibited.
If you follow these recommendations, then a roof with flexible tile cladding will delight its owner for many years.
Material calculation
Any roofing structure must withstand a load of 200 kg/sq.m, regardless of the weight of the roofing material itself. To obtain correct calculations, it is necessary to add the weight of the ceramic tiles to this indicator. Thus, the roof frame is created taking into account the roof load of 250 kg/sq.m.
Installation of natural tiles is carried out by overlapping, the size of which is influenced by the roof slope. If there are slopes of less than 25 degrees, installation is carried out with an overlap of 10 cm, with a slope of 25-35 degrees - 7.5 cm, and with a slope of more than 45 degrees - 4.5 centimeters.
To obtain the useful length of the material, it is necessary to subtract from the total length of the ceramic element the segment necessary to form the overlap. Data on the usable width are indicated by the manufacturer in the attached instructions. Based on these two values, the roofing material per square meter of coverage is calculated. The result obtained is rounded up.
In addition, you can determine the number of tile elements along the length of the slope, based on the useful length of the tiles. The resulting indicator is the number of tile rows. Then you need to calculate the number of elements in one row, and multiply the result by the number of rows.
With a roof slope of 22 degrees, the installation of a waterproofing layer made of rolled material is required. The overlap of the canvases should be ten centimeters. To calculate the waterproofing material, it is necessary to multiply the area of the slopes by 1.4.
The most accurate calculation of the materials required for roofing work can be made using special computer programs or using online calculators.
Roof covering with roll materials
The construction of flat roofs allows the use of rolled materials, the strips of which are laid overlapping, and in the same direction:
- when the slope of the flat roof is more than 5%, then the outer overlap width is 10 centimeters, and the inner width is 7 centimeters;
- when the slope does not exceed 5%, the overlap width for all layers is at least 10 centimeters.
If during the gluing process the panel deviates from its location, you should try to return it to its place without peeling off the material. But if it is impossible to move, the glued piece is cut off and the panel is glued again, maintaining a 10-centimeter overlap.
When a flat roof is installed, strips of rolled material are laid in layers (for more details: “Roll roof installation - coating properties”). If installation is carried out using liquid mastic, each layer is glued at intervals that cannot be less than 12 hours.
Features of flat roofs, detailed video:
Material calculation
To calculate the number of tiles, you need to know the size of the roof, but not only that. The tiles are laid with an overlap, the amount of overlap is determined depending on the slope of the slope:
- Up to 16 degrees – from 10 cm;
- Up to 30 – from 8;
- Over 30 – from 7.
Ceramic tiles are laid on the roof using counter-lattice and sheathing. The second serves as a solid base for the coating, the first provides the necessary ventilation gap.
For the sheathing, sawn coniferous timber with a maximum moisture content of 25%, without knots, is used (SNiP, paragraph II-25-80).
- The pitch of the sheathing (and therefore the number of boards) depends on the slope of the roof and on the model of the tile (order - from 30 centimeters);
- The minimum cross-section of beams for sheathing and counter-lattice is 3 by 5 centimeters;
- For complex roofs or long slopes, use a square beam with a side of 5 cm.
To calculate the amount of material and its final cost, you can use the services of our company.
Or calculate it yourself: ceramic tiles in drawings (for example, Braas) can be presented in the form of a diagram indicating all sizes of the tiles.
How to make a soft roof
Installing a roof is a complex task that includes a number of specific stages.
Moisture-resistant plywood, OSB board or edged board are used as the foundation on which the soft roof will be laid. It is also allowed to use other building materials with a flat surface and a humidity of no more than 20%. The seams of such cladding must have a certain gap. For plywood and OSB boards, a minimum gap of 2-3 mm is allowed; for edged boards, a gap of 5 mm must be left. This is necessary so that when expanding under the influence of temperature and moisture, the base does not begin to deform. On edged boards, annual rings are centered down.
This system is designed to ensure proper quality of air circulation, which prevents the formation of condensation on the back side of the base. If you neglect this stage, then soon the rafter system may begin to rot, and in winter ice and icicles may form on it.
Roof ventilation includes the following elements:
- vents in eaves overhangs;
- ventilation outlets;
- the gap between the waterproofing and the base is at least 5 mm.
To ensure that the attic is properly ventilated, shingle manufacturers recommend that the vents be distributed evenly along the entire ridge.
The arrangement of a soft roof includes the organization of a lining layer. It is mounted on the eaves overhangs, ends and valleys of the roof from top to bottom. For roof slopes greater than 18 degrees, you can make a lining layer only in those places where there is the greatest likelihood of leaks. Ridges and valleys are covered with a layer 25 and 50 cm wide, respectively. In this case, the valleys are equipped with a lining layer on both sides.
For roof slopes from 12 to 18 degrees, the lining is placed over the entire roof area, starting from the bottom, moving parallel to the eaves upward. The overlap between the lining strips in the longitudinal direction should be 15 cm, in the transverse direction - 10 cm. The lining is fixed with special nails at a distance of 20 cm from each other. To achieve better tightness of the lining layer, the overlap areas are lubricated with bitumen mastic.
Installation of cornice strips
The elements are made of metal. They are attached to the eaves overhangs directly onto the lining. Wooden strips are necessary to protect the edge of the sheathing from rain and wind. Fastening is carried out using mounting nails with a wide head at intervals of 100 mm. At the junction of the cornice strips, an overlap of at least 2 cm is made.
Installation of gable strips
As in the previous case, the slats are made of metal. They are laid at the ends of the roof on top of the lining layer. The purpose of these strips is to protect the edge of the sheathing from the ends. Fastening is carried out similarly to the strips on the cornices.
Necessary for additional protection of the roof from rain and snow. Choose it to match the color of the roof. Fix the carpet with wide-headed nails. The overlap is carefully glued with bitumen mastic.
Installation of cornice tiles
When laying soft tiles, remember that before starting work you must remove the protective film from the back of the tiles. Eaves tiles are placed at a distance of 10-20 mm from the edge of the eaves (for more details: “Soft tiles - laying technology: “six rows” method”). In this case, each element of the tile is laid exactly end-to-end.
Lathing and counter-lattice
- Along the rafters, on top of the waterproofing film, we lay counter-lattice bars approximately 1.3 meters long.
- We fix it with galvanized nails every 0.3 meters not higher than the marker line on the film.
- At the joints of opposite beams on the ridge, we saw the boards at an angle so that the joint is even. The angle of the cut will depend on the slope of your roof.
- Between the beams of the valley or hip ridge and the main counter-lattice we leave a ventilation gap of about 10 centimeters.
- We place the sheathing beams parallel to the earth's surface, starting from the overhangs.
- The step between the first two bars (on the overhang) is from 32 to 39 cm (measured along the outer edges of the bars).
- We place the third block under the ridge, at a distance of three centimeters from the joint of the counter-lattice bars. If the roof is steeper than 30 degrees - at a distance of two centimeters.
- We measure the distance between the second and third beams along their upper edges.
- We divide the resulting figure by the number of intermediate bars so that the step between them does not exceed the recommended parameters:
- Roof slope up to 22 degrees – 31-32 cm.
- Up to 30 – up to 33.5;
- Over 30 – up to 34.5.
We install the sheathing on other slopes in the same way.
Inversion flat roof installation technology
The inversion type of roofing is more reliable and durable than a traditional roof; it does not leak for several decades.
When constructing this type of structure, the order of the layers changes, which improves the quality of the roof. Unlike the first method, such a structure can be operated.
- For minimal loads, foam-insulating, heat-insulating, and waterproofing materials are used. Roll-type materials are used as the final coating.
- For medium loads it is necessary to use stronger and denser thermal insulation. Paving slabs or other types of similar material are used as the final covering.
- For significant loads, reinforced material is installed between the main layers of insulation. And as a final coating, a reinforced concrete slab is used.
Installation of an inversion flat roof is carried out in the following sequence:
- First, prepare the base, lay a reinforced concrete slab, then cover it with a primer so that the built-up waterproofing adheres well.
- Laying waterproofing material is somewhat different from the traditional method. First, waterproof material is laid, it can be PVC or rolls containing bitumen.
- Then they begin laying the insulating material.
- Then geotextiles are laid out, which should be located between the insulating materials of the internal composition and the final covering.
- At the end, the final covering is laid; for roofs with minimal load, roll-type materials or crushed stone are used, which are applied to the entire surface. For a roof with an average load, you can lay paving slabs or use other durable materials. For significant loads, use a monolithic reinforced concrete slab.
Why should you contact MosStroyKrovlya for installation?
- You can contact us at any convenient time. A weekend or holiday is not a reason to postpone the installation of a roofing system. In addition, our specialist can take measurements even in the evening, so you don’t have to change your plans or take time off from work.
- You don’t have to worry that the master from MosStroyKrovli will not have experience in working with the roofing material you need. For each type of roofing system, our team has a separate specialist who guarantees the quality of the service.
- You can get a favorable discount on our work. When ordering our services during the holidays, you have a chance to place an order 5-10% cheaper than usual.
Important: You can order the service of installing a finishing ceramic coating on the roof from our company for 690 rubles per sq. m.
m. This price applies when working with a simple roof, and in other cases it increases to 890 rubles. DESIGN
Types of soft roofing structures
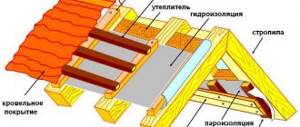
Roofing pie is a generalized technical term that combines a number of structures with a similar “layered” structure. The combination of layers should protect the home owners from atmospheric attacks and protect the internal filling of the pie from premature deterioration.
The standard structure of a roofing pie includes the following required components:
- Vapor barrier. Prevents the penetration of vapors from the interior of the house and the condensation of moisture on the building materials used in the construction of the roof;
- Thermal insulation. Helps retain heat, protects against noise, winds, and cold temperatures coming from outside;
- Waterproofing. Prevents the penetration of rainwater and melted winter precipitation into both the roof structure and the building;
- A decorative coating that simultaneously acts as a wind barrier.
The category of soft roofs includes materials with excellent waterproofing qualities. These include bitumen roll representatives, piece analogues, mastics and a new generation of membranes. A couple of decades ago they served only as a barrier against water, but now they also successfully play the role of decorative coatings. This is due to the improved external surface and the development of installation methods that allow super-thin materials to be attached to any type of base.
The combination of insulating and decorative properties has made it possible to reduce the number of main layers in a roofing pie to 3, if one of the types of rolled materials is used for arranging the roof.
When laying bitumen shingles, waterproofing is not completely abandoned. However, it is laid as an additional waterproof layer and covers the roof either completely, if the slope of the slopes does not exceed 18º, or partially in strips along the overhangs, along the ridge and valleys, around pipes and at junctions on roofs with slopes steeper than 18º.
The above list of main roofing layers has the nature of general recommendations. In fact, it is modified by reducing or adding functional elements, because the scheme for forming an ideal roofing structure is influenced by a number of significant circumstances, such as:
- type and purpose of the object being developed, i.e. is it a residential building or a domestic structure;
- temporary or permanent use, determining the use or rejection of thermal insulation;
- the shape of the roof and the steepness of its slopes, directly related to the choice of materials for the roofing;
- type of base for installing a pie and laying a soft roof;
- the presence of an exploited or unexploited attic;
- regional climatic features, according to which the thickness of thermal insulation is determined;
- compatibility of construction layers, because in case of incompatibility, separation or migration layers will be required.
A well-designed soft roof pie is constructed taking into account the entire range of the listed conditions. Without information about the specifics of the project, no one will give exact recommendations, but it is worth familiarizing yourself with the principle of construction, regardless of whether you will build the cake yourself or hired roofers will do its installation.
How to lay ceramic tiles
Attention: in this article I will only tell you how to lay ordinary ceramic tiles, i.e. on the slopes. In addition to slopes, the roof has other nodes:
- Endovy;
- Ridge (except hipped roofs);
- Cornices;
- Connections (to pipes, roof windows, etc.);
- Gables have pediments;
- The hip and tent ones have ridges.
Another article is devoted to the installation of all these elements.
Tile laying technology:
- Check the roof prepared for laying ceramic tiles for deviations from the plane. For two meters of roof, deviations for sheathing beams should not exceed half a centimeter.
- Lay out the tiles on opposite slopes in columns of five to six tiles.
- Lay out two rows, top and bottom, without fastening. If the length of the roof and the width of the tiles are non-multiple numbers, use half tiles.
- Mark the outer rows of tiles on the sheathing. Additional marking - after 3-5 intermediate rows.
- The bottom row of shingles should extend beyond the roof by one-third the diameter of the gutter running under the eaves.
- Lay tiles from bottom to top. Secure the first row with 4.5 mm by 5 centimeter screws or anti-wind clamps.
- On gable roofs, tiles are laid in the direction from one end to the other.
- On the hips - from the middle of the slope, which needs to be beaten off with a marking cord from the top to the middle of the cornice.
note
You need to lay tiles on triangular slopes in the following order:
- Middle vertical row;
- Bottom horizontal row:
- Second row from the bottom, from the middle to the ridges;
- Third, etc. to the top.
Which tiles should be fastened with hardware?
- Bottom row (cornice);
- Upper (at the ridge);
- Lateral (at the ends and ridges);
- Any trimmed tiles;
- At the junctions.
If the area is characterized by high wind loads, all tiles must be secured.
For different models of tiles, 4.5 by 50 galvanized screws (self-tapping screws) or universal stainless steel clamps can be used.
Laying ceramic tiles with your own hands is a long and energy-intensive process that requires highly qualified installers. Moreover, we are talking about expensive material.
Our company has extensive experience in laying roofing coverings, ceramic tiles are no exception. Entrust this matter to us, and you will receive a beautiful, high-quality roof quickly and inexpensively.
Installation of flexible tiles
Flexible tiles can generally be thought of as fiberglass tiles that have been impregnated with bitumen. Its main layer is sandwiched between layers of oxidized bitumen containing polymer additives. Thanks to these layers, the material acquires strength and ductility. It gets its color from granulates of different colors that cover the top layer. They simultaneously perform a protective function, protecting the material from UV radiation and atmospheric exposure. Recently, manufacturers have been supplying the material with a bottom adhesive layer, which is most often covered with mounting film. This arrangement of the material not only simplifies its installation, but improves the quality of installation, as it increases adhesion to the base and better seals the coating.
Polymer sand tiles
This roofing material can be classified as natural with a very big stretch. However, it is on the market. The material has both pros and cons. The advantages include:
- less weight: the weight is two times less than that of ceramics;
- almost zero hygroscopicity;
- plants and mosses do not take root;
- condensation rarely appears;
- Impact resistance - does not break when dropped;
- lower price - this is a budget option that looks almost the same as expensive ceramics;
- easy installation.
Polymer sand tiles look very good.
Disadvantages require attention - you need to make a decision taking them into account:
- Frost resistance of the material is 200 defrost-freeze cycles. This is five times less than ceramics and cement-sand tiles.
- Under the influence of ultraviolet radiation, a slow process of erosion occurs - the tiles gradually become thinner. It will serve its term, but you shouldn’t hope for a significant excess.
- With temperature changes, the tile deforms - it changes shape. This may cause the roof to leak.
As you can see, polymer-sand tiles have serious disadvantages. But the price is attractive: a square meter of coverage costs from 340 rubles. When choosing, it is worth remembering that if the production technology is violated, problems begin: after a few years it begins to crumble, literally by hand. Therefore, the choice of manufacturer is very important.
If you decide to cover your bathhouse with polymer tiles, you need to know that there are some installation features: each tile is secured with two nails or self-tapping screws. In this case, it is necessary to leave some play: it must be able to move. It is advisable to use stainless steel fasteners: galvanized nails.
Installation tools
Flexible roofing can be laid by 1 person; the only requirement for the roof surface is that its slope must exceed 12º. The maximum slope angle is not limited. The work requires the following materials and tools:
- knife,
- hammer,
- sealant,
- mastic,
- roofing nails,
- work gloves,
- trowel for applying mastic,
- ridge-cornice strip,
- end and cornice strips,
- waterproofing underlay carpet.
Surface preparation
The base to which the material is attached must be solid. This distinguishes the construction of a roof made of soft tiles from roofs for which other materials are used. For comparison: metal tiles are laid on a sheathing, between the beams of which a gap is allowed. This is due to the high rigidity of metal tiles. A soft roof does not have this, so it requires preliminary installation of a solid base.
OSB (oriented strand boards), moisture-resistant plywood with a thickness of 9 mm or more, as well as edged or tongue-and-groove boards are used for it. Any of these materials are laid with the seams shifted, that is, staggered, while leaving a gap of 1 cm between them.
The surface must be clean, smooth and dry. The quality of installation and service life of the coating depend on these conditions.
The roofing pie must also have the following layers:
- first, a vapor barrier material is laid on the rafters;
- if you plan to install an attic, mineral wool insulation is laid on top;
- from the outside, a waterproofing roofing carpet is attached to the base, for example, OSB boards, using the overlapping method using roofing nails; each of its strips is unfolded horizontally from bottom to top with an overlap of 15 cm.
In addition to protecting against moisture, the underlayment protects the roof from destruction if the installation of soft tiles is temporarily not carried out.
Metal tiles
To begin with, it is advisable to familiarize yourself a little with the brief characteristics of the coating.
Metal tiles
Prices for metal tiles
metal tiles
Advantages
Low cost, quick installation, wide selection of colors and geometric shapes. Durability can also be mentioned, but this indicator depends not only on the brand, but also on the manufacturer. If the tiles are manufactured with gross deviations from generally accepted standards and with violations of technology, then after 6–7 years the coating will have to be repaired or replaced. Conscientious licensed manufacturers provide a guarantee of 25 years or more for elite brands of products.
Metal tile Pural
Metal tile Elite
Metal tile Monterey
Comparison of metal tiles and ondulin
Flaws
It makes noise during heavy rain or hail. The disadvantage is not critical; no one is going to sleep lightly in a bathhouse. And if there is an attic on the second floor, then the mineral wool used to insulate the roof perfectly dampens sound vibrations. Conclusion - metal tiles are an excellent roofing covering for baths.
Metal roofing on a bathhouse
Transportation
Metal tiles must be transported only in a horizontal position; the length of the body must be greater than the length of the material. Unload the roofing carefully, carry the sheets only in a vertical position, do not allow sharp bends.
Transportation
Carrying sheets Carrying sheets of metal tiles
Unloading metal tiles
We will describe the most difficult method of installing metal tiles - with a warm roof. Depending on the specific use of the attic space, you may be able to simplify the installation process and skip some steps.
Step-by-step installation instructions
Step 1. Check the correct construction and dimensions of the rafter system. Most baths have the simplest gable roof types; checking their dimensions does not take much time.
Bathhouse with rafter system
How to do it? First you need to check the diagonals of the rafter system; the difference in values should not exceed two centimeters; such a spread can be easily hidden by additional elements. Next, pull a rope between the outer rafters, they should all lie in the same plane. Places with deviations should be noted; corrections of deflections are done while nailing the sheathing.
Step 2. If possible, treat all wooden elements of the rafter system with complex antiseptic agents. They will reliably protect the tree from damage by rot and pests and increase fire safety indicators. For a bathhouse this is an important factor.
Treating rafters with an antiseptic
Step 3. Laying waterproofing.
Roof waterproofing
It will protect the insulating layer from moisture vapor condensation. Condensation always forms on the underside of metal tiles; droplets of water can fall on mineral wool, which significantly reduces its heat-protective properties. In addition, prolonged contact of wet cotton wool with wooden structures can cause premature damage. The insulation itself will be laid on the roof from the attic side and additionally protected by a vapor barrier layer.
Waterproofing is sold in rolls; during installation you need to follow the markings; there are lines on the front surface. Simple bathhouse roofs do not have valleys, but they may have a chimney outlet. Start doing waterproofing right around the chimneys, stretch the material along the entire perimeter and secure with a stapler. Make sure that all overlaps are directed in the direction of condensate drainage; it is advisable to glue the membrane joints with special tape or ordinary tape.
Roof waterproofing
The chimney has been processed - proceed to waterproofing the slopes. Place the rolls from bottom to top and secure them to the rafters with a stapler. Do not allow the material to sag significantly; under no circumstances should it touch the mineral wool. The membrane can be additionally fixed to the rafters with 50x50 mm counter-lattice slats.
Fixing waterproofing with counter battens
Scheme of fixing the waterproofing film
This device increases the efficiency of natural ventilation between the roofing and the sheathing. Some builders skip this operation; they believe that the gaps between the sheathing and the covering sheets are sufficient for ventilation. Both methods have a right to life, but we would not recommend saving too much when arranging roofing coverings.
Step 4. Installation of the sheathing.
Lathing for metal tiles
Nail wind boards along the eaves, and wrap the waterproofing over the boards.
Wrap the film over the wind boards
For lathing, you can use boards 30 mm thick and 100 mm wide or slats 30x50 mm. The first board or batten from the eaves should be a centimeter thicker than the others to increase the strength of fixation of the sheets and prevent them from being undermined by strong gusts of wind. The pitch of the sheathing should be equal to the pitch of the wave of metal tiles.
Lathing for metal tiles - photo
Nail the first batten at the eaves and check its position. It must be strictly parallel to the ridge, otherwise the waves of the tiles on the roof will not be perpendicular to it, and this is considered a defect. In order to speed up the process of nailing the sheathing, you need to cut several slats along the length of the wave pitch; they will be used as a template. There is a second method to speed up the work - use a rope with blue to beat off parallel lines along the counter-lattice at the required distance. When nailing the slats, be guided by these lines. The skate must have slats; the distance of the slats from the skate cannot exceed ten centimeters. The slats are needed to fix the ridge metal element of the roofing.
An example of lathing for metal tiles on a roof with roof windows
A continuous sheathing is made in the valley
The wavelength of metal tiles depends on the brand and thickness of the sheet; select tiles taking into account the individual characteristics of the roof. Each manufacturer supplies its products with instructions describing the optimal performance of the roof and climate zone. Along the perimeter of the chimney you need to make a continuous sheathing approximately 20÷25 centimeters wide.
Step 5. Installation of the chimney apron.
All manufacturers produce additional elements for roofing, and their list also includes metal flashings for chimneys. They look like flat plates; you need to cut the technological bends yourself, taking into account the dimensions of the chimney.
Measure the width of the bottom of the chimney, mark this value on the bar symmetrically to the edges. Draw a line about 10 centimeters wide with a marker, cut off the vertical edges with scissors, and bend them perpendicular to the drawn line. The entire part of the apron along the line must be bent at an angle equal to the exit angle of the chimney wall on the roof slope. Don’t be afraid to make a mistake; when fixing the element, the angle will be adjusted to the existing dimensions.
Installation diagram of additional elements around the chimney
Start installing the apron from the bottom wall of the brick pipe. A flat sheet of metal (tie) with flanges on the sides should be placed under the lower element of the apron; water will flow along it into the catch basins. The side walls of the pipe are finished in the same way, and the top part is sealed last.
Roof pipe bypass
In order to prevent water from getting through the chimney stacks under the roofing, it is recommended to recess the side strips into the brickwork. To do this, you need to attach it to the wall and draw a line of contact with the upper edge of the strip on the chimney. Using a grinder with a diamond blade, a line (groove) is cut along the marked location. The cut needs to be cleaned of dust and washed. The curved edge of the strip is inserted into the groove and sealed along the entire length with silicone. This should be done around the entire perimeter of the brick chimney. The planks are screwed with countersunk screws to the roof sheathing. The junction points are the most dangerous in terms of leaks; be very careful when performing all operations to seal them.
Insulating the chimney on the roof from water
The external chimney sealing apron is installed after laying the metal tiles. Some craftsmen do not want to install an internal apron; we do not recommend simplifying the process of installing the coating by increasing the risk of leaks. In terms of time, the complete installation of one apron will not take more than two to three hours; this is not the time, by saving which one can expose the entire roof of the bathhouse to additional risk.
Step 5. Installing hooks for the drainage system.
Drain hook and gutter diagram
The hooks should be fixed before installing the metal tile drip, this is very important. Immediately after the hooks, you can install cornice strips.
Important. The bottom of the eaves strip should fall slightly into the gutter. Otherwise, during strong gusts of wind, rainwater will fall on the wooden elements of the cornice. The gutter of the drainage system itself can be installed after installing the metal tiles.
The distance between the holders is approximately 50 centimeters. The overall slope of the gutter should be at least three millimeters per meter of length; mark a line on each holder for bending in the desired location.
Distance between hooks
Let's look at how to do this with an example. Let’s say the length of the bathhouse roof slope is 6 meters, the slope between the outer holders should be approximately 6×3 = 18 millimeters. Place all the hooks in a row and align their ends. On the first, mark the bend point, and on the last, mark a point ≈18 millimeters below the first. Connect the dots with a line; each hook will have a mark for its bend. Of course, the holders need to be numbered so that later during fastening they do not change places. Don’t be upset if you fail to maintain millimeter precision during bending; the gutter itself will fall into place over time.
Markings for attaching hooks with a slope
Hook marking
Step 6. A hole for the outlet funnel is marked on the gutter; the width of the hole depends on the diameter of the drainage system. The hole is cut with a hacksaw for metal. Insert the gutter into the holders with an overlap of several centimeters; the edges of the individual pieces of the gutter should fit into the special seats. Secure the gutter with metal tabs to the holders. To improve the sealing of the joints of individual pieces of the gutter, seals can be installed. Plugs are installed at the ends of the gutter. The funnel is installed under the hole and fixed by bending the metal tongue.
Laying the gutter and installing the plug
Step 7. You need to bring the edges of the waterproofing sheet over the installed cornice strip and glue it with double-sided tape. In this position, condensation will fall from the canvas into the gutter, and not under the cornice.
Step 8. Sheets of metal tiles are lifted onto the roof one at a time; you can use wooden logs installed from the ground with emphasis on the beginning of the slope.
Slides for lifting metal tiles
Lifting a sheet onto the roof
If the bathhouse is two-story, then you should use canvas straps to lift it.
The first sheet must be laid exactly along the line of the eaves and the end of the roof.
Fastening the first sheet of metal tiles
If the rafter system was made according to all the rules, then no problems should arise. If there are errors, place the first sheet with an offset of no more than 1÷2 cm, the last sheet will also have such an offset. The end additional element will cover the unevenness of the sheets.
Installing the valley strip
Fastening is done with special roofing screws with rubber washers.
Self-tapping screws for metal tiles
Self-tapping screws for metal tiles, how many are needed for 1 sq. m.
Important. The self-tapping screw must be screwed into the sheathing by at least two centimeters.
At the bottom of the sheet, fastenings are made in each deflection of a wave; subsequently, the sheets are fastened through the deflection in a checkerboard pattern. If the sheets are stacked from left to right, then the second sheet overlaps the first, if in the opposite order, then it overlaps the first. This should be kept in mind and do not tighten the screws on the outer waves of the metal tiles before laying two sheets.
Metal tile laying technology
Sheet stacking sequence
You need to move on the roof very carefully, only in soft shoes, your feet should be placed only in places where the waves bend.
Moving through sheets
Self-tapping screws must be tightened without under-tightening or over-tightening. The rubber washer should be pressed tightly against the surface of the sheet, but not deform it.
Correct and incorrect installation of roofing screws
How to screw in a self-tapping screw
Step 9. Installing the ridge strips.
Ridge installation
They can be flat or semicircular, and are equipped with end caps of the appropriate profile. Place the planks with an overlap of up to 10 centimeters and secure them to the metal tiles with ridge screws.
Ridge for metal tiles
Step 10. Installing the end strips.
Align the ends, all the sheathing slats should be on the same line. The planks are fixed to the wind boards on one side, and to the roofing on the other.
Fixed end strips
If the bathhouse uses a metal sandwich pipe for the chimney, then in order to reach the roof, you need to install a special additional device for engineering equipment - a rubber outlet. The diameter of its outlet changes due to cutting off the upper part of the corrugated seal.
How to seal the outlet of a metal pipe
| Step, No. | Description | illustration |
| Step 1 | Mark the location of the chimney outlet on the roof and cut a hole with metal scissors | Cutting a hole |
| Step 2 | Make the same hole in the waterproofing, apply silicone sealant to the waterproofing seal, glue it and secure it to the slats or sheathing boards with metal strips | Pull the seal over the pipe (soap solution makes installation easier) |
| Step 3 | Place the base of the exit to the metal tile profile and bend it to size | Press the seal down and shape it along the base of the roof |
| Step 4 | Apply a layer of sealant on the bottom side of the outlet, install the outlet in place and secure it around the perimeter with self-tapping screws. The diameter of the rubber insert of the device should be approximately 20% less than the diameter of the chimney pipe | Apply sealant under the flange Secure the flange with screws to the base. Distance between screws approximately 35 mm |
If you wish, you can install ventilation holes on the roof. The technology is no different from that described above, only the appearance and engineering design of the ventilation cap differs.
Snow guards
Snow guards
The final touch is the snow guards. It is recommended to install them in areas with heavy snow cover; they protect drainage systems from mechanical damage. The brackets are placed at the bottom of the metal tile wave just above the sheathing. Mark the locations and use a thin drill to drill holes in the tiles and slats. They are needed for bolts and screws of increased strength; snow retainers must withstand heavy loads. It is recommended to fasten the brackets on rubber pads; the snow retention tubes are inserted into the holes of the brackets.
Tubular snow retention for roofing
Prices for snow guards
snow guards
Video - Installation of metal tiles
Practical advice
- It is strictly forbidden to cut metal sheets with a grinder; high temperatures burn out not only the polymer coating, but also the zinc layer. As a result, corrosion processes immediately begin in these places and unsightly traces of rust form on the roof. The metal must be cut with special scissors; you can use an electric jigsaw or power saw with disks with pobedit teeth.
It is forbidden to cut metal tiles with a grinder
- When fixing large sheets of metal tiles, it is difficult to reach narrow slats with self-tapping screws. It is not advisable to make several attempts and make holes in the metal tiles. To make the screwing process easier, we recommend using a rope. Fix one end of it to the end of the batten, and temporarily pull the other over each sheet of metal tile and fix it to the middle of the batten. Such a simple device will eliminate the possibility of error.
- If for some reason deep scratches have formed on the surface of the sheets, it is better to immediately repair them with paint; purchase a can of aerosol paint of the appropriate color at the store.
Sheet processing with repair composition
What is a green roof and how to build it
Green roofing allows you to give the building an original look and design. This roof has a number of advantages:
- By saving space, you can grow various vegetables and berries, ornamental plants on the roof, and create a comfortable area for relaxation or business meetings in a green atmosphere.
- With the help of plants, more oxygen appears on the site, that is, they have a beneficial effect on the environment. Plants are also capable of absorbing various toxic substances if the city is heavily polluted.
- The layer of soil located on the roof cools the room inside in the summer and insulates the room in the winter.
- Thanks to this structure, the level of sound insulation increases.
If you plan to build such a roof, then you need to strengthen the structure, since a significant load will be placed on it.
Green roofing can be of two types:
The extensive type of roof is covered only with ornamental plants or lawns, while the soil layer is up to 15 centimeters. Watering is carried out only when the grass begins to grow and other plants are placed in pots. At the same time, lawns are trimmed periodically, as needed.
The intensive type of roof allows the placement of soil up to 60 centimeters, that is, you can plant not only decorative, but also fruit plants that have shallow roots. A garden or vegetable garden can be placed on a roof of this type, and the load-bearing structures must withstand significant loads. This type of roofing is expensive.
Installation of a green roof is carried out according to the principle of a conventional reinforced structure. First, a reinforced concrete base is laid, then waterproofing material is placed. After this, polystyrene foam is laid, it serves as an insulating material. Geotextiles are laid out and drainage is made from crushed stone or gravel. Then the geotextiles are laid again and the soil placement begins. After all the layers have been laid, the necessary plants can be planted.
They construct such a roof at a slight slope so that excess water can flow down without hindrance. Otherwise, it is necessary to install a drainage system, otherwise in case of stagnation of water, the roof pie will deteriorate. Moisture will begin to penetrate into the room, this can lead to the destruction of the flow, and subsequently the walls.
Thanks to this solution, the roof can be given an original look, and various vegetable and fruit plants can be usefully grown. Among such an atmosphere, you can create a play complex for children, an area for relaxation, tea drinking, and other events.
When installing a green roof, water should not be allowed to stagnate on the surface. It is better to plant plants that do not require frequent watering. You also need to take into account the load exerted by the soil located on top; the structure must be reinforced to withstand the entire expected weight. It is advisable to make all calculations before work on the construction of the roof begins.
Stage X. Installation of ridge tiles
To install a natural tile roof ridge, follow our detailed tutorials. Here's how to install a ridge on a ceramic tile roof:
If you have a residential attic under such a roof, then use an aero element that has the largest cross-section for ventilation - this is “Figarol”. If there is only a cold attic in the under-roof space, then any other aero element will provide ventilation.
To install ridge shingles, bend the beam holders so that when installing the beam, the distance from the top edge of the beam to the top edge of the rafter matches what you previously measured.
Trim the tiles so that the gap remains 2-3 cm. Fasten the trimmed tiles to the sheathing with corrosion-resistant 4.5 and 50 mm screws, or directly to the ridge using copper wire. Special stainless steel clamps are also suitable.
You will need to place one holder at the end and the beginning. After this, tighten the lace and install the intermediate fastener directly along it.
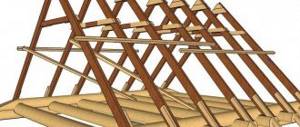
Preparation of the truss structure, counter-lattice
The installation of the truss structure is carried out in accordance with the project documentation and SNiP, taking into account snow and wind loads in a particular area. The use of composite tiles is possible with a minimum slope slope of 1:5, approximately 12 degrees. If some roof elements have a lower slope, it is necessary to first carry out 100% waterproofing of these elements, for example: with roll-guided bitumen materials on a solid wooden flooring, and lay composite tiles for decorative purposes.
Fig 4.1-1
The ends of the rafters are sawn vertically. Anti-condensation waterproofing is laid on them Fig. 4.1 - 1. Recommended use: Yutakon-140, Nikofol NW, DELTA MAXX or their analogues. If the thickness of the insulation is equal to the thickness of the rafters, it is necessary to use Tyvek super-diffusion waterproofing. Installation of waterproofing is carried out using horizontal sheets, from bottom to top, starting from the eaves, with a vertical overlap of at least 150 mm and a horizontal overlap of at least 100 mm. At the same time, ensuring that the film sag between the rafters by 1 or 2 cm. Do the vertical joining of the panels on the rafters. The first waterproofing sheet is lowered below the edge of the rafters by 100 mm. In the upper part of the slope, the waterproofing is not extended to the ridge by 100 mm for ventilation of the space VK-2 Fig. 4.1 - 2. Along the rafters, on top of the waterproofing, a counter-lattice, a block with a cross-section of 50×50 mm, is placed to create a ventilation duct VK-1, fasten the waterproofing and ensure ventilation of the under-roof space Fig. 4.1 - 2 - A. The lower end of the counter-lattice beam is sawn vertically, hanging over the edge of the rafter by 40mm. Rice. 4.1 - 1
Fig 4.1-2
If the roof slope angle is less than 200, the counter-lattice is made of bars with a cross-section of 50x75 mm to increase the cross-section of the ventilation duct VK-1 Fig. 4.1 - 2 - B. If the roof structure has a valley, installation of waterproofing and counter-lattice begins from the valley, in accordance with P 4.8. When installing thermal insulation, make sure that there is a VK-2 ventilation duct between the waterproofing and thermal insulation.
ATTENTION! A prerequisite for normal roof operation is the presence of ventilation ducts VK-1, VK-2! The result is the functioning of the roof without ice freezing and condensation formation. When using Tyvek superdiffusion waterproofing, there is no VK-2 ventilation duct.
Installation video
MetroBond - panel installationDescription: Correct installation of the panels will ensure waterproofness of your roof and emphasize the beauty of the architectural design of your home. Duration: 03:31 Video format: YouTube | ||
MetroBond - installation of eaves strips and tile step sheathingDescription: This unit not only gives your home an aesthetic appearance, but is also the most important element of the ventilation system for the under-roof space. Along with the installation of the eaves strip, the installation of step lathing is shown in detail. Duration: 08:23 Video format: YouTube | ||
MetroBond - installation of end stripDescription: Correct execution of this unit not only gives your home a finished, aesthetic appearance, but also provides protection for the pediment from wind, snow and rain. Duration: 07:13 Video format: YouTube | ||
MetroBond - installation of tiles to a heating pipe (part 1)Description: This unit is present on almost any roof, because heating and ventilation systems are an integral part of the roof of any modern country house. Duration: 07:58 Video format: YouTube | ||
MetroBond - installation of tiles to a heating pipe (part 2)Description: This unit is present on almost any roof, because heating and ventilation systems are an integral part of the roof of any modern country house. Duration: 08:23 Video format: YouTube | ||
MetroBond - bringing the valley to the roof slopeDescription: This knot is often found in the presence of dormer windows. Duration: 10:25 Video format: YouTube | ||
MetroBond - installation of ridge and tile hipsDescription: Correct installation of these components will ensure waterproofness of your roof and emphasize the beauty of the architectural design of your home. Duration: 11:12 Video format: YouTube | ||
MetroBond - installation of roof windows on tilesDescription: Dormer windows turn your attic into a full-fledged, bright living space. Duration: 15:10 Video format: YouTube | ||
MetroBond - installation of roof tiles in the valleyDescription: Correct execution of this unit will ensure waterproofness of the roof and emphasize the beauty of the architectural design of your home. Duration: 13:11 Video format: YouTube | ||
MetroBond - installation of roof fans and penetrations on tilesDescription: These elements are the most important components of the ventilation system of any modern country house. Duration: 13:40 Video format: YouTube | ||
Installation of tiles on the eaves
- Install the curtain rod. The thickness of the cornice board should be 40 mm.
- Attach the cornice board to the rafters with nails.
- Install the brackets for fastening the gutters onto the eaves board Fig. 4.3 - 1 Callout II. If installation of gutters is not planned, then a condensate drip is installed on the eaves board. Fig. 4.3 — 1 Callout I. The condensate drip tray is made from the eaves strip Fig. 4.3 - 2. In this case, the consumption of the cornice strip will double.
- Starting from the edge of the cornice, install the cornice element.
- The cornice element is secured with four nails.
- Install the remaining cornice elements with an overlap of at least 100 mm.
Fig 4.3-1
ATTENTION! When installing the cornice, you must make sure that:
– a waterproofing film is laid on top of the eaves board so that there is unhindered drainage of condensate into the gutter of the drainage system Fig. 4.3 - 1 Callout II or on the condensate drip Fig. 4.3 - 1 Callout I; – the eaves drip line goes into the drainage system; – between the eaves element and the waterproofing there is space for the flow of air into the under-roof ventilation through the ventilation duct VK-1 (dashed line); – in the cornice lining there are channels for the flow of air into the under-roof ventilation along
ventilation duct VK-2 dotted line.
Fig 4.3-2