If you are engaged in building a house, you must outline for yourself some vectors of work, some kind of plan that will bring clarity and structure the chaos.
Let's determine what steps precede the finished and harmonious appearance of the finished roof. 1. Choosing tiles: which roofing material to choose 2. Carrying out calculations - how not to make a mistake when ordering a roof 3. Using materials and tools for installation 4. Preparing the surface for laying tiles 5. Important technical aspects of laying tiles 6. Differences in the shape of slopes - rectangular, trapezoidal and triangular 7. Care of metal tiles and quality assurance 8. Errors when fixing metal tiles
The emphasis in this article will be on metal tiles, as one of the most popular types of roofing coverings and the issue of its installation requires special attention. Following the instructions for installing metal tiles will guarantee that the roof will be reliable, airtight and aesthetically beautiful.
Choosing tiles: which roofing material to choose
How do you know which roofing material to choose for your home? To do this, you need to study the main characteristics of each of them and decide what is important to you.
Ceramic tiles are one of the most durable, beautiful and time-tested roofing materials. Its main disadvantage is the high price. Then - weight. In addition, the material is very fragile and often has problems during delivery. Installation of such a roof will also cost a pretty penny, since it is labor-intensive and requires a complex rafter system.
Metal tiles are a profiled sheet of metal 0.4-0.5 mm thick, coated with a layer of zinc and a protective polymer coating. Today we present several types of profiles and a wide color palette. With proper installation of metal tiles, the warranty reaches 50 years. Disadvantages can only appear due to poor installation and storage conditions.
Seam tiles are flat, narrow sheets of galvanized metal coated with a protective polymer layer, which are connected to each other using a special curved lock - a seam. This lock completely eliminates the possibility of leaks.
Soft bitumen shingles are a flexible roofing material that can be laid even on round roof elements. The base is fiberglass, which is impregnated with bitumen and covered with inorganic chips. Installation of tiles requires continuous sheathing, which increases the cost of roofing.
Composite tiles - this version of the roofing material imitates ceramic tiles. The base is a steel sheet, the outer side of which is covered with natural stone granules.
Roofing corrugated sheeting – the main advantage of this product is its low price. Today there is a wide range of coatings and colors on the market. It is easy to install and durable.
Slate – today you can find asbestos, metal and soft slate (ondulin). Among the advantages are good sound insulation, maintainability, and durability. The disadvantages include the heavy weight and fragility of the materials.
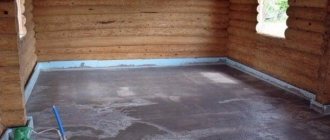
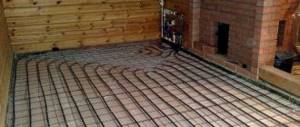
Roof insulation
Before installing thermal insulation, a vapor barrier is first placed on the rafters. The maximum layer of material to retain heat is 25 cm . An antioxidant film is mounted on it, and fastening occurs with wooden blocks to the rafters.
To ensure that precipitation flows into the drain, fix the thermal insulation with a slight allowance (2-3 cm).
Carrying out calculations - how not to make a mistake when ordering a roof
It is better to entrust roof calculations to a professional. Here you need to count not only the number of metal tile sheets (for this you just need to know the length and width of the slope and the width of the metal tile sheet), but also take into account many nuances, such as additional elements, correct lathing, hydro- and vapor barrier, seals, screws and much more .
The roofing calculator presented on our website will help you calculate the required amount of materials. Just enter the type of roof, dimensions, materials used - and you will receive complete information.
Do-it-yourself roof covering with metal tiles
Work on laying tiles is carried out in the following order.
Do-it-yourself roof covering with metal tiles
First stage. Actually, we have already discussed it above - it consists of installing a cornice strip to the frontal board of the sheathing. We remind you once again about the mandatory 12-centimeter overlap.
Second phase. Then you can proceed directly to laying the metal tiles. It is worth noting that the installation technology completely depends on the type of roof.
- In the case of a gable roof, you need to start work from the end of the slope. If it was decided to cover from the right slope, then each subsequent sheet is installed on the extreme wave of the previous one. But if the material lies on the left end, then the new sheet is installed under the extreme wave of the one in front of it.
- The hipped roof needs to be covered from the highest point, gradually lowering (it all comes down to the peculiarities of the geometric shape of the hipped roof).
All sheets must be laid parallel to the cornice, with a mandatory 4-centimeter plumb line.
Third stage. If the sheets are installed in one row, then the first of them must be aligned with the cornice and temporarily fixed with a self-tapping screw in the ridge area. The second sheet needs to be aligned with the first and temporarily connected. So it is necessary to install two more sheets, then align the formed block along the cornice and secure it to the sheathing with self-tapping screws.
In the case of multi-row laying of metal tiles, the first sheet must be installed at the bottom, secured with a self-tapping screw and aligned along the end and cornice. A second sheet of tile is installed on top, and a third one on the side. All of them are temporarily attached with self-tapping screws. Then you need to level the formed block and finally fix it on the sheathing.
Finally, if the slope has a triangular shape, then first you need to determine and mark the center line on it. The same line should be drawn on a sheet of tiles. Then both lines are combined, the sheet is fixed with self-tapping screws. Subsequent installation is carried out on both sides of the first sheet.
Fourth stage. Self-tapping screws should be screwed into the recesses of the sheets through one wave. Each new row of screws should be staggered relative to the previous one. There should be 7-8 screws for each square meter of material.
The overlaps need to be strengthened in each wave.
When covering a roof with metal tiles, special attention should be paid to the reliability of fastening the sheets and the accuracy of their joining.
How to cover a roof with metal tiles
Tools and additional materials used
To install metal tiles you will need:
- Screwdriver + screwdriver attachment 8x45;
- Scissors for cutting metal;
- Roulette;
- Electric nibblers;
- Corrugated pliers;
- Drill attachment for cutting metal;
- Stapler with staples;
- Jigsaw for wood;
- Screws made of hardened steel made of EPDM rubber, average consumption of 7 screws per 1 sq.m;
Preparing the surface for installation of metal roofing
When starting to work at height, you should first take care of safety. When working on a roof with a large slope, it is necessary to use a safety rope and a special belt, as well as shoes with rubber soles and gloves.
In order to correctly install a metal roof, it is necessary to correctly assemble the “roofing pie”.
A quality roofing pie includes:
- Rafter system
- Frontal board
- Lathing
- Layers of vapor and waterproofing
- Cornice strip
- Counter-batten
- Gutter hooks
- Kapelnik
- Metal tiles
Insulation boards should be cut with an allowance relative to the rafter distance. Approximately 10-15 mm wider. The insulation should lie flat.
Then we lay vapor barrier and waterproofing films. They roll out horizontally, along the rafter system, in the direction from bottom to top. The overlap between insulation strips must be at least 150 mm. To ensure a tight seal, the application areas are taped with a special tape.
To drain water from the films, you need to install a drip line on the front board under the films.
The wood for the sheathing must be dried and treated with antiseptic agents before installation.
It is worth remembering some nuances about laying the sheathing:
- The distance between the first and second battens of the sheathing should be equal to the wave height of the metal tile - 250 mm. The remaining slats are laid in increments of 350 mm.
- In places of complex connections, bypasses and fastenings of additional elements, it is necessary to make a continuous sheathing.
After installing the sheathing, long drainage hooks are installed (if short hooks are used, they are installed together with the drainage system).
A counter-batten is mounted on the main lathing.
Then the cornice strip is installed. It protects the space under the roof from moisture and debris.
We install additional elements (lower valley and bypass around the chimney).
It is also necessary to ensure free air flow when filing the cornice. To ensure under-roof ventilation, you will need KTV valves, and use vinyl soffits to cover the eaves.
Now you can begin installing the metal roofing.
Creating a sheathing
Metal tiles are laid on the sheathing. The counter-lattice is made of wooden blocks with a cross-section of 50x50 mm. These bars are placed vertically from the ridge to the slope. Boards 25 mm thick and 100 mm wide are laid on top with a rafter pitch of 600 mm. If the rafter pitch is 900 or 1200 mm, then 30x100 mm boards are used.
Boards and bars should have a moisture content of no more than 20%, otherwise the material may greatly change its geometry. Coniferous wood species are used for laying the roofing system. Read more about choosing wooden blocks and boards in the articles “How to choose a block” and “How to choose a board”.
Lathing and counter-lattice allow you to form a ventilated gap under the roof, which separates the layers of waterproofing and insulation from the external roofing material. Thanks to the ventilated gap, excess moisture is removed from the “roofing cake” and exits the ridge aerator or KTV (roofing point ventilation).
The combination of different layers in a roof is called a “roofing pie”. This is a special sequence of materials with different properties. The concept often includes a wide variety of elements, and there are layers that are present in most cases: vapor barrier, insulation, waterproofing, ventilation gap, sheathing, external roofing material. Read about the construction of a “roofing pie” in the article “Roofing Construction”.
- The distance between the sheathing boards is equal to the pitch of the metal tiles. Measurements must be taken from the central part of the board so that the fastening element that will fix the sheet on the roof does not fall into the edge of the board.
The sheathing pitch can be controlled using a special device - a sheathing template.
Before installation, lumber must be coated with antiseptic compounds to protect it from the development of rot and mold.
- If the length of the board is not enough for the entire surface of the roof, then the joining is done on bars. The seam should not sag. In this case, it is necessary to install the boards staggered so that one vertical seam does not form.
- Roofing rough nails are used to secure the counter-lattice. You can also additionally use self-tapping screws.
The ventilation gap is not sealed and remains open for air circulation inside the “roofing cake”. In this case, the hole must be closed with a special mesh to prevent birds from getting inside, as well as leaves, dust and other debris.
- On skates, you need to secure an additional sheathing board on each slope. At the same time, if the waterproofing allows steam to pass through well, then an overlap of waterproofing film is made on the ridge. If the waterproofing material has low vapor permeability, a gap remains in the ridge for subsequent installation of the aerator.
Technical aspects of laying tiles
Sheets of metal tiles should be laid in rows: from left to right, from bottom to top. The first row of sheets should protrude 50 mm beyond the cornice. The sheets are attached to the deflection of the wave under the step, in the places adjacent to the sheathing.
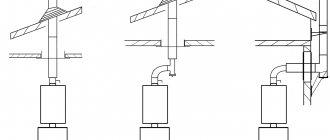
Pipe bypass installation
To form a pipe bypass, we install a “metal apron” from junction strips. The lower part will go under the tiles by 200 mm, and the upper part by 150-200 mm will rise along the pipe.
- The junction strip is mounted on top in a groove or overlay.
- A sealant should be installed in the upper part of the “apron”.
- The joints of the strip and the gaps between it and the pipe should be carefully sealed.
Gutter installation
- Long hooks are installed before installing the roofing material. The eaves board must be at least 200 mm wide to securely attach the hooks.
- If the drainage system is installed after the roof has been installed, we recommend using short hooks and mounting them directly on the roofing board.
- The cornice strip is mounted on the cornice board on top of the hooks with an overlap of at least 20 mm on each other
- To prevent damage to the gutter when snow falls off the roof, we recommend installing the first hook on the front board so that the outer edge of the hook is 20 mm below the imaginary continuation line of the eaves board (Diagram 2)
More information about installing a drainage system: Installation instructions for a drainage system
The rules for installing walk-through elements, roof windows, and roof safety elements are described in detail in the instructions attached to the orders.
Attention to detail
Covering a roof with metal tiles is rarely complete without decorating the chimney and cornices. To protect the pipe, it is necessary to insert a valley, which will break the flow of water, causing it to flow over the surface.
Step-by-step instructions for decorating a cornice include:
- Attaching the cornice strip. Its width is 10-15 cm. It is attached vertically to the rafters under the protruding part of the metal.
- Installation of sheathing. From the wall of the house to the eaves strip.
- Fastening metal sheets of appropriate width. A corrugated sheet is used to decorate the cornice.
- The joint between the vertical and horizontal parts of the cornice is closed with a metal corner.
The final stage of the work is closing the protruding part of the sheathing under the slopes . For this purpose, a profiled sheet is used. When laying it, the direction of the wave is aligned.
Triangular and trapezoidal slopes
- When installing metal tiles on these types of slopes, additional counter-battens are installed along the ridges of the slopes.
- Further steps are similar to the installation of standard roofs. Then the cornice board, cornice strip, drain hooks and drip line are installed.
- The sheet of metal tile is cut along an oblique line so that the distance to the sheet of the next slope is 60-80 mm.
- Installation of ridge strips is also carried out from the bottom up.
It is important to ensure that the axis of the ridge strip runs clearly along the axis of the ridge. The junction of the two ridges and the ridge can be formed with a plastic Y-shaped tee.
Maintenance of metal tiles and quality assurance
To ensure that your roof lasts as long as possible, we recommend:
- Monthly roof inspection from the ground;
- Annual inspection of each roof slope with a rise to the eaves level;
- If necessary, carrying out roof maintenance work;
- The valleys should be cleared of debris; this requires removing the decorative part;
- If leaks, high humidity, condensation, or uneven temperature of the walls in the attic appear, it is necessary to apply for a comprehensive roof repair.
Scratches must be touched up with a corrector for repair;
Installation of waterproofing and vapor barrier under metal tiles
Before laying the tiles, everything must be carefully insulated from condensation and moisture. This is necessary to prevent corrosion of the insulating material and maintain high temperatures in the attic without the appearance of moisture. However, we can agree that it’s as simple as that and that’s all. Let's look at the step-by-step isolation instructions.
STEP 1: installation of waterproofing. We climb onto the outer part of the roof and lower rolls of protective material along the rafters from the ridge to the eaves. The overlap should be left at least 150 mm; it is better not to use staples, but to use special adhesive tape (if you don’t have the money for this, you can take regular double-sided tape - it will do). The sagging at the cornice is 2-3 centimeters.
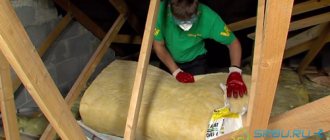
STEP 2: insert insulation. A short instruction on how to fit in something that can’t be squeezed in: cut out rectangular pieces of mineral wool (ecowool or other miracle material that you think of installing) 5 centimeters wider than the distance between the rafters. We squeeze the rectangle a little, with a slight movement of the hand (legs, head or other parts of the body) we push it into place. Due to its elasticity, it is clamped between the rafters and hangs there. Similarly, we fix the roof insulation between all the rafters.
STEP 3: attach the vapor insulator. No matter what type of roofing you are installing, including metal tiles, you will definitely need instructions for installing vapor insulation. We go from the inside of the roof and arm ourselves with a stapler. You can buy a special construction staple thrower or confiscate your child's educational paper stapler - it will be enough. Nail it to the rafter with a bracket every 20 centimeters. This layer is required and without it the insulation will pick up moisture , losing its insulating properties.
You should end up with a kind of pie, where there will be 2 layers (vapor barrier and waterproofing) and a filling in the form of insulation inside. It would be best to carry out this work in the absence of wind, since it may slightly disrupt your plans and you will have to redo the work several times. The film is not very strong and a strong gust of wind can simply tear it off the rafters.
Please note that most waterproofing and vapor barriers are made directional, that is, they cannot be laid on any side. They should let air out and keep moisture out. If installed incorrectly, all the water will accumulate on the insulation and all your efforts will be as useful as a laptop for Indians.
Errors in installing metal tiles
- Errors in roof calculations - it is better to entrust this matter to professionals, otherwise it may affect the cost and add additional costs.
- A sheet of metal tile the entire length of the slope - it is better to divide a long sheet of metal tile into 2 shorter ones. This will make the delivery and unloading of the material easier, there will be less risk of deforming the metal, and it will also make it easier to lift the sheet onto the roof and lay the roof.
- It is necessary to strictly follow the instructions for installing metal tiles and the “layout” that is offered to you when calculating the roof. Otherwise, the desire to save money can lead to additional seams on the roof, and this will affect the tightness and exterior.
- Refusal of counter-latching - laying tiles directly on waterproofing without counter-latching is undesirable. This can significantly reduce the life of the roof.
- Unleveled sheathing - as a result, the seams will be clearly visible and the waterproofness of the roof will be reduced.
- Saving on insulation - insulation is important, it prevents the under-roof space from cooling down in winter and from overheating in summer, it reduces the level of “noise” of metal tiles and minimizes condensation from entering the under-roof space, so it is important to achieve the right balance of insulation thickness and ventilated gaps to ensure air circulation.
- Using a grinder is a sure way to damage the polymer coating. Metal tiles can only be cut with metal cutting shears.
What you should know about working with metal tiles
When talking about how to cover a roof with metal tiles, first of all it’s worth talking about the necessary tools. You will need:
- Hammer;
- Screwdriver;
- Marker;
- Roulette;
- Rake-rule;
- Metal scissors.
When planning roof construction, do not forget:
- The roof slope angle must be at least 14 degrees;
- You should not cut metal tiles with a grinder, because... high temperatures contribute to the destruction of the protective layer. You also need to know how to cut metal tiles correctly so as not to damage it;
- If you plan to cover a roof with a complex shape, purchase material in large quantities, because... when cutting, there will be a lot of unnecessary trimmings;
- Purchase reliable paint, which must be used to carefully paint the cut areas of the metal tiles in order to protect them from corrosion;
- A roof with metal tiles needs additional sound insulation;
- When laying metal tiles, walk on them in soft shoes, trying to step on the concave part of the wave.