Expert answer
A self-leveling floor, in fact, is no different from a regular screed, the only difference being that liquid self-leveling systems are used for this. The thickness of such a coating is small and most often is no more than 5 mm, and it can be a finishing coating or used in the form of a quick-hardening mixture. The latter is intended for arranging the base for floor coverings such as laminate, linoleum or parquet boards. The main advantage of self-leveling systems is that when spreading, they can easily fill existing unevenness and at the same time “bring out” the horizontal to the ideal. Of course, if you follow the technology, you won’t be able to install such a floor at an angle. The mixture will tend to take a horizontal position, or, more simply put, flow to the lowest point.
However, there is information that some home craftsmen were able to install a self-leveling floor at an angle. To repeat their result, you will have to deviate a little from the technology. The mixture is diluted with less water - and its fluidity is greatly reduced. You will have to level the surface manually - using a long spatula or a rule, having previously installed inclined beacons. The best self-leveling floor that can be recommended for arranging an inclined surface is the finishing leveler Vetonit 3000. While the mortar is setting, you will have to adjust the surface several times as a rule, otherwise slipping of the mixture cannot be avoided. I would like to immediately warn you that it will most likely not be possible to obtain a perfectly smooth “mirror” floor - the surface will need to be polished to perfection using abrasives. However, maximum accuracy and diligence will allow you to achieve the desired result - practice confirms that what you have planned is quite feasible.
The main building material at any stage of construction and repair is concrete. This is due to its technical characteristics and properties, as well as its low cost compared to other similar materials. In certain situations, pouring sloped floors may be useful. In the process of performing work, there are certain nuances that must be taken into account without fail. If the concrete screed technology is not followed, then you don’t have to think about strength.
Is it possible to level individual sections of the screed with self-leveling flooring?
Is it possible to use the self-leveling floor Starateli Thin to level individual sections of the floor (holes 5 mm deep) without filling the entire surface of the floor, so as not to raise the floor level?
Can. But is it necessary?
The self-leveling mixture will, of course, fill in the holes. However, it should be taken into account that the self-leveler, like any other liquid, colloid or suspension, is affected by the force of surface tension.
The force of surface tension does not allow a liquid or suspension to spread flush with the surface on which it is located.
And although the composition includes modifying additives that increase fluidity, the boundary between the untouched and filled areas with self-leveling floor will not be smooth. The surface of the filled “puddle” will spread horizontally, but its edges after hardening will be slightly raised above the general level.
The joint between the self-leveling floor and the unfilled screed will not be smooth.
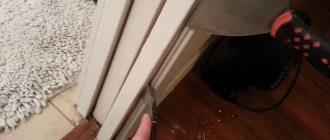
You can reduce this effect by first moistening the edges of the intended fill and leveling the problem areas with a spatula at the moment when the composition is just beginning to set.
When leveling individual sections of the screed with a leveling compound, its edges should be leveled using the following rule:
But the difference will still be noticeable. You may be satisfied with this result. For example, if the floor is being prepared for tiling with tiles larger than 10x10 cm, a difference of 1-2 mm is not critical. But if we are talking about preparation for self-leveling epoxy coating, mosaic tiles, thin linoleum - this is unacceptable. Also, differences will create problems when laying floating floors if the substrate is thinner than 3 mm.
When preparing the surface for floating floors (laminate, parquet boards), the horizontality of the surface is not of great importance.
Irregularities can be sanded off by hand or with a sander. This is not very difficult, but it will take time; during the work, fine dust will fly around the room, and you will have to spend money on abrasive materials.
Small irregularities can be easily removed with a grinder and an abrasive wheel
By leveling only certain areas in the room with a self-leveling mixture, you may not get the desired result. If the floor plane is strictly horizontal, and we are really talking about only a couple of “pits”, your plan will work and by sanding the edges of the fills, you will get a flat floor, albeit with additional time and effort.
If the screed is horizontal, and only individual holes need to be eliminated, it makes sense to fill the floor with fragments; you just need to sand the joints
If there is no common horizon, you risk getting a surface consisting of “patches”, the middle of which is horizontal, the edges are raised, but there is still no general level. To correct the situation, you will have to grind the entire surface with a grinder or fill it with a level again, but this time the entire area.
Sanding the entire floor surface with an industrial sander is a troublesome, dusty and expensive task.
We recommend that before deciding to level the screed in fragments, you carefully check the floor level over the entire area. If there is no common horizon, it makes sense to fill it entirely with a self-leveling compound, this will provide you with an ideal result. Fortunately, the self-leveling floor “Starateli Thin” spreads normally even in a millimeter layer (recommended - 1-20 mm). The floor level will practically not rise relative to the highest point. Having calculated the average layer thickness, you can determine the consumption of the dry mixture using the online calculator: https://poli-nalivniye.starateli.ru/catalog/228-228
You will get a guaranteed flat and horizontal surface if you fill the entire floor area with self-leveling. Of course, subject to strict adherence to the manufacturer's recommendations
If you still don’t want to fill the entire area (for example, you need a flat plane, not a level), and the floor has a slope, we recommend filling the holes not with a level, but with tile adhesive. Just use not a cheap mixture, but a composition for complex bases; it is stronger and will adhere better to the surface of the screed. Prospector Lux glue is quite suitable. You can level the plastic mixture using a rule.
Watch a visual video about the technology for eliminating defects in concrete floor screed using tile adhesive here: https://www.youtube.com/watch?v=ryTCct03bzw
A few words about the technology of leveling screeds with self-leveling floors. It is very important to follow the manufacturer's recommendations. Violation of the proportion of mixing with water, non-compliance with the working time with the mixture will inevitably lead to defects. The work technology must be followed in the strictest possible manner. The surface of the screed must be durable, thoroughly cleaned, dust-free, and impregnated with a primer intended for concrete.
Deep-penetrating primer for mineral surfaces will strengthen the concrete surface and improve the adhesion of a self-leveler or tile adhesive to it.
Application area
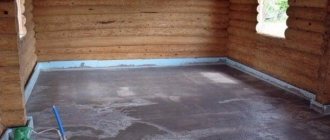
The most popular among rooms where concrete screed is laid on a slope is the bathroom. In addition, external territories cannot do without such a device. These include entrances to the garage, personal plots, and premises of economic importance. Screed in a bathhouse or when installing shower cabins, the floor is also actively installed with some slope.
Such a screed device is necessary in places of unorganized outflow of water in order to compensate for the difference between adjacent surfaces. If you have an idea about the process of installing a concrete floor, then no difficulties will arise during the work. There are no special features. But some recommendations are worth considering in order not to deviate from the technology itself.
Stage two. Pouring concrete
Prepare materials, tools and equipment. For pouring you will need gravel, sand, cement, a concrete mixer, usually a container for mortar, a trowel and a level. The amount of materials depends on the size of the bathhouse and the thickness of the concrete. The minimum pouring height cannot be less than 10 cm. To increase the stability of the structure, it is recommended to use building reinforcement of a periodic profile with a diameter of 6–8 cm or metal mesh.
Preparatory work
Step 1. Remove fertile soil and large construction debris from the site. If possible, treat the soil with special products to prevent weed growth.
It is necessary to remove grass and large stones
Prepared base
Step 2. Using a laser or water level, make a zero floor mark along the perimeter of the foundation. It is from this mark that the depth of concrete placement and the thickness of all layers will be controlled. Calculate the parameters and, if necessary, deepen the pit. The soil can be removed manually, but you should constantly check the horizontal surface of the bottom.
Step 3. Begin filling the pit with gravel.
Beginning of backfilling, first layer
The thickness of the material is within 15–20 cm. It should be filled in layers of approximately 10 cm, then the gravel is leveled and compacted. Leveling is much easier with an ordinary metal rake.
Backfilling in layers of 10 cm
It is recommended to use screenings with fine crushed stone for the first layer; it compacts better and holds loads. If the floors are poured in several rooms of the bathhouse, then work should begin with the most distant one; the material can be transported along wooden ladders. Due to this sequence, the need to re-level the bedding is eliminated.
Step 4. Each layer of bedding must be compacted separately. This can be done manually or using a special unit. Working manually is long and difficult, and the quality may be unsatisfactory; professionals recommend using vibrating plates.
Tamping with a vibrating plate
You should go over one place at least three times, fill large depressions immediately, and remove the mounds. The smoother the bedding, the less expensive concrete will be needed to fill the floor.
Step 5. After tamping, you need to pour a layer of crushed stone of fraction No. 10–20 with a thickness of 10–15 cm. After leveling, tamping follows, the algorithm for performing the work is the same as for fine crushed stone with screenings.
Loading crushed stone
Another layer is filled
Practical advice. You should not use crushed stone of large fractions, it is much more difficult to work with, and there is no noticeable positive effect.
The thickness of each layer should be controlled according to the marks previously made on the foundation tape.
Leveling the crushed stone layer
Step 6. Prepare the last layer; you can use sand or fine screenings for it. Choose the material that is cheaper in your region; from a practical point of view, there is no difference. After leveling, tamp down thoroughly. It is advisable to moisten the last layer with water and let it sit for at least one day, during which time the bedding will shrink and gaps and other problem areas will be revealed. They must be removed immediately and compacted again.
Sand filling
Elimination, backfilling
Step 7. Install the beacons according to the selected thickness of the screed. Beacons are much easier to install using a laser level. Drive wooden pegs or pieces of metal rod into the bedding along the beam line. If there is no laser level, then the outer beacons can be set at the water level, then stretch a rope between them and adjust the height of all the remaining ones. The distance between the beacons is 40–50 cm. The width of the lines should be 15–20 cm less than the dimensions of the plaster.
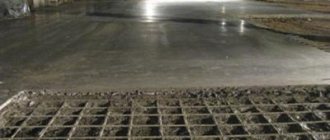
Step 8. To increase the strength of the concrete floor, use reinforcing mesh. Raise it above the bedding; the mesh should be located approximately 1/3 of the height of the concrete. Building codes prohibit placing it in the middle of concrete; in this position it does not strengthen the structure. To raise the mesh, you can use various supports or pour a little concrete under it with a shovel and lift it off the ground with your hands.
Welded mesh laid
Step 9. Place concrete on a row of pegs.
Concrete is carried with a shovel
Important. Concrete must be mobile, but not liquid. Follow the recommended proportions of components; in most cases, the mass requires one part cement to three parts gravel and two parts sand. But this is an optional recipe; if a more durable coating is required, then the amount of cement increases by 15–20% and vice versa. There are marks on the foundation of the bathhouse, opposite which the pegs of the lighthouses were hammered. Use a trowel to smooth out the concrete a little and make lines above the pegs; they will help guide you when laying the slats.
Leveling concrete with a trowel
Step 10. Put the metal or wooden slats in place, carefully check their position; the quality of the concrete floor depends on its correctness. Move the rivers left/right until they completely shrink. Raise the reinforcing mesh and adjust the position of the slats again.
Profile laying
The master lifts the mesh so that it is located in the thickness of the concrete
Practical advice. In our case, the water will be drained in the middle of the steam room or wash room. Such a device requires that the floor be angled towards the drain. This condition will be met during laying of ceramic tiles. Concreting floors sloping towards the center is very difficult, keep this in mind when performing work.
To avoid damaging the driven pegs during concreting, it is recommended to cover them with bricks on both sides.
Pouring the floor with concrete
How to pour a concrete floor faster and easier? There are several recommendations from experienced builders.
To facilitate the process, make a chute for the concrete mixer , along which the mass will be directed to the right place. To prevent the gutter from pressing the reinforcing mesh against the bedding, place a piece of brick under it and lift it up.
Gutter
Pouring concrete
During work, constantly move the mesh inside the concrete layer , tear it off the ground. Using a shovel, alternately throw concrete between the two lines; the thickness of the material should be slightly greater than the height of the beacons.
We recommend that you first perform a rough edit of the mass using a shovel and trowel . Due to this rule, less concrete is removed, the work is much easier, the surface is even even after one pass. If the network is deep, then pour the mixture into them and go through the rule again.
Pouring a concrete floor by hand is physically difficult; you have to constantly work in an inclined position. knee pads on sale , we advise you to buy them and use them. They will allow you to change your body position as you get tired.
Do not spread the mixture over a large area - it is very difficult to correct. The width of the area should allow you to easily reach the edges with your hands in a kneeling position.
Master laying concrete with a shovel
After each leveling, lift the net again. While walking, it constantly lowers; if the reinforcement rests on the bedding, then there will be no increase in the strength of the floor, remember this. Use the same method to screed the entire room.
Experienced builders use the rule of 2.5–3 meters in length; beacons are made at approximately the same distance. Due to this, not only does the pouring speed significantly increase, but the surface also becomes smoother. An additional condition is that the rule must be quite rigid and not sag in the middle while pulling together excess concrete, otherwise small depressions will form between the lines. This is unacceptable for precise pouring, but it is not a problem for finishing leveling screed.
Leveling the concrete layer
While working with the rule, you need to constantly clear the slats from stones; the plane of the tool should not bounce. Remember that following recommendations always takes much less time than eliminating defects. Do not try to simplify the technology yourself; such experiments do not lead to anything good.
Do not pull together a large lump of concrete. The rule will definitely bend, the surface will have to be trimmed several times. If you made a slight mistake with the amount of concrete poured between the beacons, it doesn’t matter. As soon as the rule has collected a large volume, spread the mass with a trowel over the free spaces and only after that continue to pull it together.
Leveling the solution using the rule - photo
According to existing standards, it takes approximately 14 days for concrete to harden , during which time it gains at least 50% of its maximum strength, which allows construction work to continue. Inexperienced builders try to continue working on the floor after a few days, once the structure can support their weight. We categorically do not recommend doing this. The fact is that weak concrete produces microcracks, which are initially invisible to builders. But then, over time, microcracks will certainly increase in size, and the strength of the structure will not correspond to the expected parameters. The consequences of haste can be most unpleasant.
Concrete floors do not remain in this condition; they definitely need to be finished. There are several finishing coating options.
- Wooden logs or slats are laid on the concrete, and boards are laid on top.
- The floors are finished with ceramic tiles. If the concrete is poured correctly and evenly, then a screed is not required. If the technology was violated during the work or the craftsman does not have enough practical experience, then a leveling screed will have to be made.
Video - DSP screed with a slope towards the ladder
We will briefly look at the option of a concrete floor covered with ceramic tiles.
Installation features
The drainage in the required room can be completed using the following methods of pouring floor screed:
During installation, you should carefully and constantly check the functionality of the drain itself in the room. Otherwise, you will have to waste time on drilling and cleaning in the future. In this case, the level difference should not exceed 20 mm for each meter of the shower or bathtub surface. Normal operation will not be possible at higher slopes. In the future, it will be problematic to lay tiles or any other type of flooring.
Installation of a floor with a slope
The drain is most often located in the central part of the room or with some offset to one of the corners. In the first case, there will be fewer problems due to the uniform distribution and installation of beacons over the area of the room. When the drain is located in a corner, the beacons will have a different order.
What should a balcony screed be like?
There are many types of poured floors. It is worth choosing the right option based on the climate zone in which you live, operating conditions and your personal taste.
Here are the main queries that a self-leveling floor should answer:
- Ability to tolerate cold, humidity and mold.
- Structural compatibility.
- Compliance with expected loads.
If you choose the wrong grouting mixture in cold or rainy weather, you may find that your floors are leaking or covered in mold and mildew. Therefore, regardless of whether your balcony is open or closed, if it is not heated, you should choose a mixture that is resistant to cold and moisture.
If your balcony is a standard loggia resting on a load-bearing wall, then you can safely buy the most ordinary screed. But if the weight of the floor is limited, you will have to look for a lightweight mixture. Otherwise, there is a risk of collapse.
Such mixtures have their own characteristics:
- they cannot be used on open balconies; there must be at least a canopy;
- there must be a finishing coating;
- cannot withstand strong, dynamic loads.
Base structure
We must not forget about the quality work done to clean the base from the old screed or any other coating. You can spend less effort and remove only all damaged areas, but in the future the remaining elements may manifest themselves in a negative way. For work, a hammer drill can be used to remove concrete. Particular attention is paid to the junctions of walls and floors.
If during the preparation process floor defects are identified (cracks, crevices, potholes, etc.), then they should be repaired with the prepared solution. All further measures can be carried out only after the solution has dried. Only in this case will it be possible to know how to fill a floor on a slope.
When the surface is ready, you should proceed to the waterproofing layer. The following types of materials are suitable for this:
- Coatings. They have excellent waterproof properties and are able to withstand high humidity and not allow it to pass through. In addition to the floor surface, they are also applied to walls. It will be enough to raise it to a level of 10 cm. The number of layers of the solution will depend on the type of coating being installed. All details will be written on the packaging of the material. You should pay attention to the drying time, since only after this can you begin all subsequent activities aimed at pouring floors with a slope.
- Pasting. Presented in the form of rolls, which are spread on the base with an overlap of each sheet of 100-150 mm. Most often, roofing felt is used, which has become part of the practice of renovating an apartment.
- Emulsion bitumen. But the duration of service is no more than 5 years. It is worth thinking about whether it makes sense to spend money on such materials in order to start the work all over again over the course of several years.
Manufacturers of compositions for self-leveling floors
There are many companies on the market, both foreign and domestic. Some compositions are praised by everyone, while others have conflicting reviews. Here you need to understand that those who often deal with this work can, using a composition that is not very good in terms of characteristics, get an excellent result. It’s more difficult for beginners: they don’t know how it should be, so they can’t correct it in time if something goes wrong. Therefore, it is unlikely that you will be able to save money: in order to get a good result, you will have to buy a composition for self-leveling floors with very good characteristics and reviews. And these are expensive brands.
Here is a list of manufacturers and compositions, with a brief description:
- Bolars is inexpensive, but difficult to work with.
- 'Prospectors - reviews vary.
- Pyramid - little experience.
- CERESIT CN78 - easy to work with, the surface is smooth, but expensive.
- IVSIL TIE-ROD-II is a self-leveling mixture based on gypsum; other compositions level a little worse.
- BROZEX NP-42 - the result is not bad, spreading is normal.
- Horizon Universal - difficult to work with.
- Vetonit Vaateri Plus is a self-leveling agent with good characteristics, it is easy to work, the surface is smooth, and it is expensive.
- Forbo 976 is a self-leveling mixture with good performance.
- Foundation T-45 - spreads and levels well, but is not suitable for thick layers (more than 10 mm).
- Plitonit (PLITONIT) - a composition for a thin layer has very good reviews.
- Kreps-RV and SL - according to reviews - normal characteristics at an affordable price.
These are, naturally, not all manufacturers, but those with which you can make a floor, and do not suffer (according to reviews of those who worked with them) ...
Fixing beacons
This stage and the choice of a specific beacon option will depend on what methods of filling the screed are chosen. If the drain is located in the central part of the bathroom or shower, then the sequence of work is as follows:
- Initially, the beacon is installed in the direction from the existing drain hole to the far corner from the entrance to the room.
- Regarding this lighthouse, marks are made on the walls using a level for subsequent elements. It will be very difficult to apply a long rule in your work, since the area of the room is small. In this case, a wide and narrow spatula will be optimal.
Lighthouse installation diagram: 1 - frieze lighthouse row; 2 — intermediate auxiliary beacons; 3 — reference beacon on the wall; 4 — lighthouse rows; 5 - mooring cord for laying the lighthouse row.
It is more problematic to install beacons when the drain hole is located in the dressing room or bathtub in the corner. Here attention is drawn to the fact that there will be different lengths of beacons. Of course, no difficulties should arise. The main thing is to approach the installation with all seriousness.
Stage three. Finishing the concrete floor
As we already mentioned, the drain should be located at the lowest point of the floor. It can be installed not only in the center of the room, but also against one of the walls. The decision should be made taking into account the placement of shelves for the steam room or shower, structural features, etc.
Floor drain layout diagram
Important. There is no need to make the slope of the coating too large; a few millimeters per linear meter is enough. In any case, all the water will go away, and work will become much easier. Another important nuance is that too much slope creates difficulties during water procedures.
There are recommendations from some builders to make the floor in the bathhouse heated. Of course, you can listen to them, but we do not recommend doing so. Why? Firstly, the floor in the bathhouse is already warm; in principle, it cannot be cold. Secondly, electrically heated floors require special wiring; the total installation power exceeds 5–7 kW. For rooms with high humidity, there are very strict safety requirements of the PUE; it is difficult and expensive to comply with them in full. Thirdly, if you are afraid that your feet will freeze, then it is much easier to make wooden grates. Place them not only in the bathhouse, but also in the dressing room and other rooms. It will be very cheap and will make washing comfortable.
Wooden grate on the floor
Drawing of a wooden grate for a bath
Keep in mind that the larger the tiles, the more difficult it is to lay them on a slope. All corners are located in different planes; it will not be possible to make the joints smooth. The best option is to use mosaic tiles. This material makes it possible to make any turns and tilts; a large number of small plates correct minor errors.
How to lay ceramic tiles with a uniform slope?
Step 1. Take four tiles, place them with corners on the drain and mark the diameter of the hole on them. Using a grinder with a diamond blade, carefully cut out the holes.
Step 2. All tiles near the drain should have a slope in two directions. We have already mentioned that there is no need to make a large angle, a few millimeters are enough. Small slopes can be made with glue; for larger ones, you will first have to screed or use cement-sand mortar for gluing.
Step 3. Throw the material under the surface of the first tile, put it in place and gradually push it in with your hands so that the drainage point is the lowest. Immediately control the amount of tilt. Place the remaining tiles near the drain in the same way, making sure that they all slope towards the hole.
Checking the levelness of the floor
Application of the solution
Leveling the solution
Step 4. Finish the first row, while controlling only one plane between adjacent tiles. This is much easier than setting two planes at the same time.
Applying mortar to tiles
Tile laying process
Step 5. The position of the tiles of the second row must be controlled according to two parameters. The edges must be located in the same plane as the first row and be parallel to each other.
Practical light. To prevent the tiles from moving spontaneously, you should make the solution a little thicker than usual.
First, it is recommended to lay four tiles around the perimeter of the drain and allow time for the glue to harden. The fact is that these tiles will be used as a template in the future; any displacements are strictly not allowed. The position of the others is constantly monitored using the first tiles; the load on them during the work is the greatest.
Trimming tiles
Slope check
Step 6. It is recommended to continue further work in parallel rows. If you have concerns about your qualifications, you can increase the area of the square plot by alternately laying tiles on each side of the square. This algorithm requires much more time, but allows you to correct mistakes in a timely manner. For beginners, it is advisable to first lay out the tiles dry and use supports of varying thicknesses instead of glue.
Tile marking
The process of laying tiles near the ladder
Tiles laid near the ladder
Laying is controlled by level
Drain in the corner, tiling completed
The larger the floor area, the longer the level should be. The tool must simultaneously control the position of at least three tiles; this is the only way to avoid kinks. The seams are sealed after the glue has completely hardened; with their help, you can slightly smooth out the sharp joints of the tiles.
Tile grout
At this point, the work on pouring the concrete floor in the bathhouse is completed, and you can begin finishing the interior surfaces of the room.
Preparing the mixture
To work, it will be necessary to prepare a high-quality solution. You can purchase ready-made options in the store, or mix everything yourself, following the proportions and recommendations. For streets and external areas, you should choose a higher grade of cement - M600. Its strength will be at the highest level. Before pouring the floor in a bathhouse on a slope, you should buy a grade of cement no lower than M400.
Fragility is ensured if the mixture has been lying for a long time and has not been used. It is very important to pay attention to the date of manufacture and service life.
To mix all the ingredients of the future solution, you need to take a concrete mixer. With its help, you will obtain a homogeneous solution with better strength characteristics. The ratio of sand and cement M400 is 1 to 4. In the future, you just need to gradually add water, obtaining a thick slurry. There should not be any sand impurities visible.
The solution should be somewhat thicker than when installing a concrete screed in other rooms. This will contribute to the full formation of the slope. In this case, surface unevenness is allowed, since they will subsequently be eliminated with tile adhesive. If the defects in the screed are obvious and conspicuous, then cutting with diamond wheels must be used.
Causes of self-leveling floor defects
The poured floor does not immediately achieve the required strength. Even if the mixture is quick-drying, it still takes a certain time for the surface to be completely ready for use, so that you can walk on it and place furniture.
If something was done incorrectly, then every day the defects will appear stronger and stronger. First of all, it is important to catch yourself in time so that you don’t have to completely redo everything later.
The quality of the coating is influenced by many factors, among which are:
- Kneading time;
- Accuracy of dosages;
- The time during which the solution was kept;
- Selected filling technique;
- As well as taking into account important factors (for example, humidity, air temperature, drafts, direct sunlight), which are certainly reported by the manufacturer in the instructions that come with the purchased material.
Before you begin to correct errors, you need to understand the cause of the defect. Basically, this is an incorrectly (insufficiently) prepared base and a violation of the manufacturer’s technological instructions.
Reinforcement process
A reinforcing mesh is placed between the exposed beacons, which improves the quality and strength of the poured mortar. An alternative is steel rods. The main thing is to fix them correctly and securely. They should not be located directly on the base, but somewhat raised above it. Concrete pours are suitable for this.
Currently, fiberglass is increasingly being used instead of any metal elements. Fiber allows you to reduce the total weight of the finished solution when installing on a slope, and also increases ductility and strength after drying. Despite its fluidity, the solution with fiber fiber fits perfectly even at an angle. If we take into account the cost, it will be even lower than purchasing a metal mesh.
Reinforcement is simply necessary if concrete is poured indoors not in one stage, but in several. If you bypass the laying of metal mesh, the concrete will begin to crumble and crack.
Errors related to pouring technology
Even when the surface is perfectly prepared, defects can appear if the manufacturer’s instructions are not followed, as well as by careless adherence to technology. In particular these are:
- There is not enough water for the solution to achieve its final hardness and strength when drying;
- Excessive amount of water, which leads to partial or complete separation of the bulk mixture;
- The mixer is too powerful, which excessively saturates the solution with air, which leads to porosity of the surface;
- The foundation was not primed, which leads to poor adhesion and uneven spreadability of the finished mixture;
- The production of the solution proceeds at a slow pace, the next portion is added too late, when the first has already partially hardened and is no longer able to adhere to the new one.
- After pouring, the floor was not treated with a squeegee or rule, which led to bumps and holes;
- Air was not removed from the solution using a needle roller;
- The heating system was turned on early;
- There were drafts;
- High or low humidity levels;
- Temperature changes.
When the causes of defects are clarified, it is time to correct the errors.
Screed installation
When there is no experience in performing such types of work as pouring the floor in a bathhouse on a slope, then you should seek help from specialists. They will tell you that installation is best done in two stages.
To begin with, prepare a solution that is thicker and contains more crushed stone. This will turn out to be a kind of base. The second layer of concrete is thicker and almost without crushed stone. The time delay between two stages should not exceed a day. If you skip more, the bottom layer will begin to dry out and will hardly be able to adhere to the second one.
Preparation of the solution
To fill formwork at an angle, mixing individual ingredients such as cement, sand and crushed stone is most often used. But experienced experts recommend adhering to the following rules:
- To prepare the solution, use ready-mixed concrete. This building material is sold in construction stores, packaged in paper bags.
- To finish the entrances to the garage, choose the M600 grade of cement; for objects with less load, such as bathhouses, use material marked M400 or M500.
- The amount of ingredients in the solution is most often determined by the experience of the master, but the proportion of cement, sand and crushed stone is approximately 1:3:5.
- It is best to mix dry components using an electric concrete mixer. This contributes to a more uniform distribution of all ingredients relative to the total mass.
- At the end, water is added in small portions until the concrete for pouring at an angle acquires a consistency similar to slurry.
When working in winter, an anti-frost additive is added to the concrete, which preserves the quality of the material.
Concreting work does not always take place in the summer. Therefore, there is often a need to make the material more resistant to low temperatures. For these purposes, additional additives and additives are used. There are the following types:
- Plasticizers. Provide an increase in the strength of concrete after hardening. When plasticizers are added, the concrete mixture becomes elastic.
- Modifiers. Prevents delamination of the material and the appearance of cracks in it. In addition, they provide resistance to moisture and reduce material consumption.
- Antifreeze. They allow concrete to be poured at an angle even at sub-zero temperatures without losing the strength characteristics of the building material.
- Hardeners. They increase the strength of the material and reduce the hardening time of concrete, which is important when pouring at an angle.
We suggest you read: How to properly heat a wood-burning sauna
Quality mixture
It is not difficult to learn how to pour a floor on a slope. Everything comes to the same conclusion with experience. But it is very important to take care of a high-quality mixture. The properties can be improved by adding various additives and components that improve the characteristics of the finished solution. The screed begins to compact on its own if plasticizers are added to the composition, and artificial fillers help increase strength after hardening, resist cracking and the appearance of fragility.
The slope angle is considered optimal up to 10-12 degrees. It will be enough for excess water to be removed into the drain in the bathroom or bathhouse. In addition, it is often possible to do without reinforcement. It is worth remembering that anyone can fill the floor on a slope. You just need to adhere to the technology and the result will please everyone.
As a rule, after a concrete floor has been laid, its surface is far from ideal. You cannot lay tiles on a “crooked” floor, as this is a violation of technology. The thickness of the glue joint should be less than 5 mm, and this can only be achieved if the floor is properly prepared for laying tiles. Mixtures for self-leveling floors can help with this.
Polymer and 3D self-leveling floors
The technology for installing polymer floors is similar to installing self-leveling ones. There is also a liquid, relatively fluid composition that needs to be distributed over the surface. The difference is in materials. These are mainly polymers. They differ according to the type of binder component:
- polyurethane;
- epoxy;
- methyl methacrylate.
In terms of coating thickness, they can be very thin - this is dust removal coating and painting, or they can have a thickness of 1.5-4.5 mm, sometimes more. The compositions are mainly two-component - before application they are mixed in strictly measured proportions. Then, like self-leveling floors based on cement or gypsum, they are poured onto a flat primed surface (their own primer) and leveled.
Polymer floors can have a glossy or matte surface, or they can have a rough surface. In apartments and private houses (for bathrooms, kitchens, corridors) they mainly use a gloss or matte surface, in swimming pools or on open terraces - a rough surface, so that it is non-slip even when wet.
This is what a glossy polymer self-leveling floor looks like
Volumetric floors with a pattern, which are also called 3D (three de) floors, are a special case of a polymer floor. The design is applied to a banner or special fabric. The main thing is careful elaboration of the design and high quality of printing. This pattern is glued onto the prepared base, then a layer of transparent polymer is poured on top. After drying, another layer of abrasion-resistant varnish is applied. The result is those beautiful pictures on the floor that many people like so much.
The basis for the quality of a 3D floor is an ideal base and high-quality pattern
Dry mixtures for self-leveling floors
The main thing that needs to be taken into account when choosing a dry mixture for leveling floors is what layer should be poured. If there are potholes in the concrete screed, then it is necessary to measure the depth of the largest potholes using a tape measure. If the depth of the “pits” is 30 mm, then it is necessary to choose a mixture intended for a thick layer. For a thick layer, the dry mixture “Bolars Epreess 1050” (instructions for use) is suitable.
Self-leveling floor mixture "Bolars Epreess 1050". Layer thickness from 5 to 100 mm
When pouring a thin layer (1-10), choose a mixture designed for that thickness.
How to fill a self-leveling floor
Why should you use a self-leveling floor? It has significant advantages over other coatings:
- You won’t have to devote a lot of time to work – a day at most;
- Long service life;
- You can choose the desired color scheme;
- The material is not afraid of moisture and does not require additional protection from chemical detergents;
- The self-leveling floor is not afraid of dirt and is easy to clean;
- This is an environmentally friendly coating that will not cause harm to health;
- The material is durable and not afraid of mechanical stress.
How to fill the self-leveling floor, what raw materials to use - the homeowner decides, depending on what goals are set.
If you plan to simply level the floor, then cement will do. You can purchase a ready-made mixture for this in building materials stores. Having achieved an even coating, decorative materials are placed on top.
For bathrooms, it is advisable to use polyurethane coatings, they are moisture resistant.
In rooms where there is expected to be a lot of traffic, and therefore the impact on the floor will be significant, methyl methacrylate is better suited. This mixture hardens quickly, dries quickly, and has a non-slip surface, that is, safe.
Decorative finishing of an apartment involves introducing into the interior elements that decorate the home. The floor will become a work of art if you use epoxy coating. Interior designers recommend supplementing it with lighting or photo combinations to give the room individuality and a special style.
When choosing raw materials, you should not forget that the operational period of the self-leveling floor is influenced by:
- humidity;
- direct exposure to ultraviolet rays;
- high traffic flow of the room;
- exposure to chemicals.
Therefore, before thinking about how to fill a self-leveling floor, you need to clearly understand for what purpose the room is intended.
Before the main work with raw materials, it is important to carry out the dismantling work correctly.
- How to pour a self-leveling floor on a concrete surface? First remove the debris remaining after dismantling the decorative coating that was on top of the concrete and clean it from dust.
- How to pour self-leveling floor on ceramic slabs? No dismantling is required here. It is enough just to check the integrity of the slabs, replace the collapsing elements, and close the recesses.
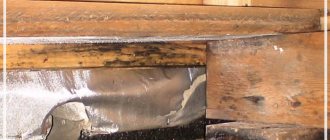
- How to pour a self-leveling floor on a wooden floor? In this case, you will have to tinker. Floorboards can rot, lose shape, or develop cracks. It makes no sense to fill on such a chipped surface. First you need to strengthen the floorboards and close the cracks using sealant. Cement mortar will also work. Then all the unevenness is smoothed out, and only then, when the preparatory period is over, they proceed directly to pouring.
Professionals advise using edge tape before pouring, which is laid around the perimeter of the room. Whatever thickness the floor is supposed to be, such a tape should be selected.
How to fill a self-leveling floor: step-by-step instructions
1. Prime the surface twice. First, apply the first layer, wait at least four hours, then repeat the coating.
2. Level the level. Beacons are used for this. The gap between beacons must be at least a meter.
3. Prepare the mixture following the recommendations on the package. A good solution will have the consistency of sour cream.
4. The mixture is applied in even portions and leveled with a spatula.
5. Beacons are removed.
6. Use a roller to remove any air bubbles from the coating.
7. The coating should be left for 48 hours to dry completely.
8. When the coating has dried, it is necessary to carry out work to strengthen it and prevent cracks from appearing. Thin cuts are made, where the sealant is inserted and treated with sealant.
9. The coating must be allowed to dry again.
Rough screed
Before making a concrete floor in a bathhouse, it is necessary to perform a rough screed. Typically, the thickness of such a layer is no more than 10 centimeters (optimally 5-7).
Mixture recipe
To prepare the mixture, you will need sand, cement, gravel, crushed stone. When wondering what kind of concrete is needed for the foundation of a bathhouse (base), it is better to choose M400. Saving on materials can cause poor quality coatings.
Concrete mortar recipe:
- Cement M400 – part
- River sand – 1.2 parts
- Crushed stone, gravel fraction 5-10 millimeters - 2.7 parts
If M500 cement is used for pouring, the volume of gravel and sand can be increased to 3.2 and 1.6 parts.
Mixing
All components must be carefully measured and then mixed. The volume of water is determined during the process: the solution must be of optimal consistency: exceeding the permissible volume of water prolongs the hardening period and leads to cracks, while reducing it makes leveling the surface impossible.
When pouring the floor in a bathhouse with concrete with your own hands, you usually add water in portions and mix the mixture until a thick, plastic, evenly moistened consistency is obtained.
Insulation
Before pouring the rough screed, a polyethylene film with a density of 200 microns is laid on the gravel. It will not allow water and solution to penetrate into the gravel, eliminating the risk of a bridge for capillary moisture and reducing the strength level of the concrete screed.
After the insulation layer has been laid, the floor in the concrete bathhouse can be poured. Filling is carried out layer by layer and quickly, carefully leveling the surface with the desired slope. Then they pause in work, waiting for the screed to harden and gain strength (2-3 days). These days the floor is moistened by spraying water or covered with a damp cloth.
We invite you to read: What to build a bathhouse from - All about the bathhouse